10-Apr-2023
.
Admin

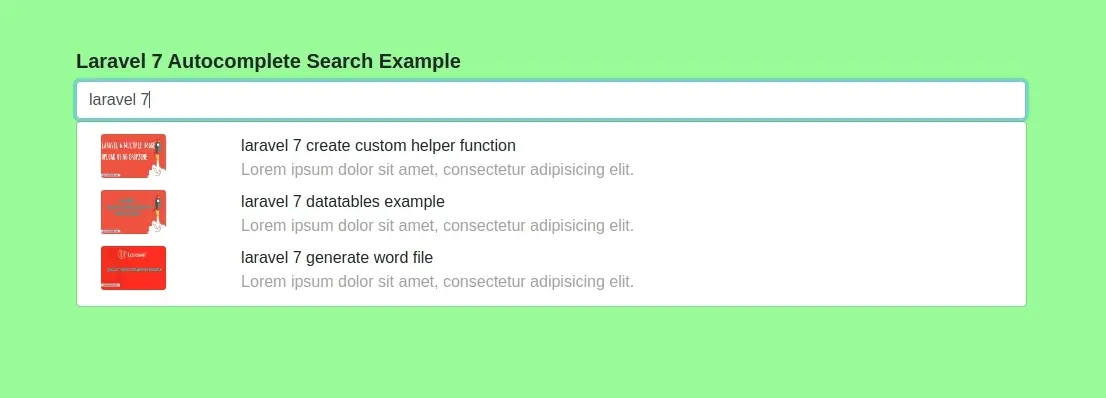
This example is focused on ajax autocomplete search laravel 7. you can understand a concept of ajax autocomplete textbox in laravel 7 using jquery. you'll learn bootstrap typeahead autocomplete ajax laravel 7. step by step explain laravel 7 typeahead ajax autocomplete example. you will do the following things for laravel 7 jquery ajax autocomplete example.
Bootstrap Typeahead JS provide way of user interface so, we can easily write code of jquery ajax and make it dynamic autocomplete search in laravel 7 application. we can easily use Typeahead JS with bootstrap.
Follow bellow step to create simple autocomplete search with laravel 7 application.
Step 1: Install Laravel Project
First, you need to download the laravel fresh setup. Use this command then download laravel project setup :
composer create-project --prefer-dist laravel/laravel blog
Step 2: Setup Database
After successfully install laravel 6 Application, Go to your project .env file and set up database credential and move next step :
DB_CONNECTION=mysql
DB_HOST=127.0.0.1
DB_PORT=3306
DB_DATABASE=here your database name
DB_USERNAME=here database username
DB_PASSWORD=here database password
Step 3: Create Migration
Now you will create a table posts then follw this command in your terminal:
php artisan make:migration create_posts_table
It command will create migration file for the posts table.
database/migrations/create_posts_table.php
<?php

use Illuminate\Database\Migrations\Migration;
use Illuminate\Database\Schema\Blueprint;
use Illuminate\Support\Facades\Schema;

class CreatePostsTable extends Migration
{
    /**
     * Run the migrations.
     *
     * @return void
     */
    public function up()
    {
        Schema::create('posts', function (Blueprint $table) {
            $table->bigIncrements('id');
            $table->string('title');
            $table->string('image');
            $table->text('body');
            $table->timestamps();
        });
    }

    /**
     * Reverse the migrations.
     *
     * @return void
     */
    public function down()
    {
        Schema::dropIfExists('posts');
    }
}
Next,this command use to in your terminal then this setup create to in your database.
php artisan migrate
Step 4: Create Model
Next,you will create to model in project.bellow this command :
php artisan make:model Post
It will create to file in app/Post.php model.
app/Post.php
namespace App;

use Illuminate\Database\Eloquent\Model;

class Post extends Model
{
    /**
     * The attributes that are mass assignable.
     *
     * @var array
     */
    protected $fillable = [
      'title','image','body'
    ];
}
Step 5: Make Route
you can create to route in web.php file.
routes/web.php
Route::get('post',array('as'=>'post.index','uses'=>'PostController@index'));
Route::get('autocomplete',array('as'=>'autocomplete','uses'=>'PostController@autocomplete'));
Step 6: Create Controller
you need to create a controller name PostController.this command use to your terminal.
php artisan make:controller PostController
app/Http/Controllers/PostController.php
<?php

namespace App\Http\Controllers;

use Illuminate\Http\Request;
use App\Post;

class PostController extends Controller
{
    public function index()
    {
    	return view('post');
    }

    /**
     * Show the form for creating a new resource.
     *
     * @return \Illuminate\Http\Response
     */
    public function autocomplete(Request $request)
    {
        $data = Post::select("title as name","image as img","body as desc")
                    ->where("title","LIKE","%{$request->input('query')}%")
                    ->get();

        return response()->json($data);
    }
}
Step 7: Create View File
In this step you need to create blade view file.
resources/views/post.blade.php
<!DOCTYPE html>
<html>
<head>
    <title>Typehead</title>
    <link rel="stylesheet" href="https://stackpath.bootstrapcdn.com/bootstrap/4.4.1/css/bootstrap.min.css" integrity="sha384-Vkoo8x4CGsO3+Hhxv8T/Q5PaXtkKtu6ug5TOeNV6gBiFeWPGFN9MuhOf23Q9Ifjh" crossorigin="anonymous">
</head>
    <style type="text/css">
        img{
            border-radius: 3px;
        }
        p{
            color: #a1a1a1;
        }
        ul{
            width: 97%;
        }
    </style>
<body>
    <div class="row">
        <div class="col-md-8 offset-md-2">
            <h5><strong>Laravel 7 Autocomplete Search Example</strong></h5>
            <input type="text" class="form-control typeahead">
        </div>
    </div>
</body>
<script src="//ajax.googleapis.com/ajax/libs/jquery/1.9.1/jquery.js"></script>
<script src="https://cdnjs.cloudflare.com/ajax/libs/bootstrap-3-typeahead/4.0.1/bootstrap3-typeahead.min.js"></script>
<script type="text/javascript">
    var path = "{{ route('autocomplete') }}";
    $('input.typeahead').typeahead({
        source:  function (query, process) {
            return $.get(path, { query: query }, function (data) {
                return process(data);
            });
        },
        highlighter: function (item, data) {
            var parts = item.split('#'),
                html = '<div class="row">';
                html += '<div class="col-md-2">';
                html += '<img src="/image/'+data.img+'"/ height="44px;" width="65px;">';
                html += '</div>';
                html += '<div class="col-md-10 pl-0">';
                html += '<span>'+data.name+'</span>';
                html += '<p class="m-0">'+data.desc+'</p>';
                html += '</div>';
                html += '</div>';

            return html;
        }
    });
</script>
</html>
Step 8: Run Development Server
you can run to laravel project in your teminal.bellow command.
php artisan serve
then make to ulr:
http://localhost:8000/post
It will help you...
#Laravel 7