03-Jan-2024
.
Admin
Hello Dev,
Today, I will let you know an example of how to implement two-factor authentication with email in Laravel 10. we will help you to give an example of Laravel 10 email-based two-factor (2fa) authentication. step by step explain two-factor authentication using an email example. you will learn Laravel auth: add two-factor verification via email. Follow the below tutorial step for easy two-factor authentication with email.
This example can be implemented with Laravel 6, Laravel 7, Laravel 8, Laravel 9, and Laravel 10 versions.
In this example, I'll provide you with step-by-step instructions on how to add two-factor authentication using email in Laravel. We'll utilize Google Gmail SMTP for sending the verification code. Follow the steps below to complete the process.
Let's see the full example code here.
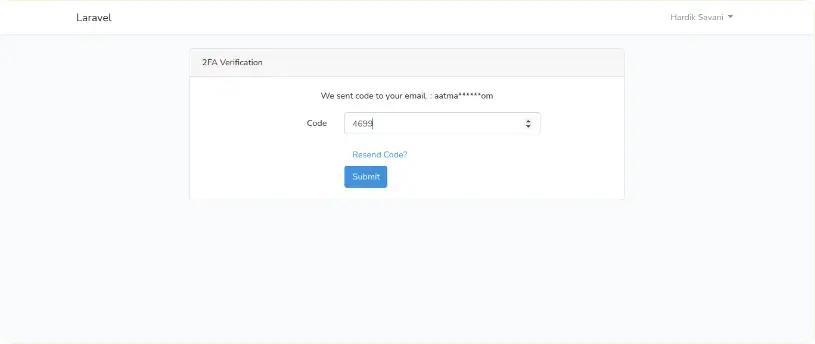
Verify Code Page.
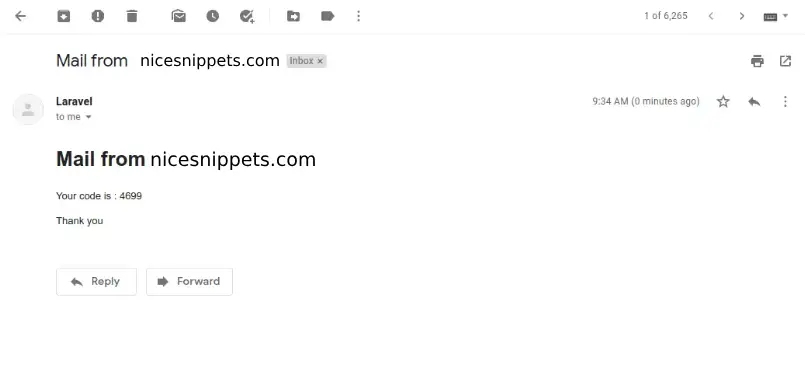
Email Content.
Step 1 : Install Laravel
To begin, let's create a fresh Laravel application using the following command. Open your terminal or command prompt and run the command below.
composer create-project laravel/laravel example-app
Step 2: Create Migration for table
Next, we need to create the user_codes table. Let's create a migration as follows.
php artisan make:migration create_user_codes
After running this command, you will find a file in the following path: database/migrations. Open the migration file and add the following code to create the user_codes table.
<?php

use Illuminate\Database\Migrations\Migration;
use Illuminate\Database\Schema\Blueprint;
use Illuminate\Support\Facades\Schema;

class CreateUserCodes extends Migration
{
    /**
     * Run the migrations.
     *
     * @return void
     */
    public function up()
    {
        Schema::create('user_codes', function (Blueprint $table) {
            $table->id();
            $table->integer('user_id');
            $table->string('code');
            $table->timestamps();
        });
    }

    /**
     * Reverse the migrations.
     *
     * @return void
     */
    public function down()
    {
        Schema::dropIfExists('user_codes');
    }
}
Now, execute the migration using the following command.
php artisan migrate
Step 3: Create and Update Models
In this step, we need to update the User model and create a new model called UserCode. Let's proceed with the code updates.
app/Models/User.php
<?php

namespace App\Models;

use Illuminate\Contracts\Auth\MustVerifyEmail;
use Illuminate\Database\Eloquent\Factories\HasFactory;
use Illuminate\Foundation\Auth\User as Authenticatable;
use Illuminate\Notifications\Notifiable;
use Laravel\Sanctum\HasApiTokens;
use Exception;
use Mail;
use App\Mail\SendCodeMail;

class User extends Authenticatable
{
    use HasApiTokens, HasFactory, Notifiable;

    /**
     * The attributes that are mass assignable.
     *
     * @var string[]
     */
    protected $fillable = [
        'name',
        'email',
        'password'
    ];

    /**
     * The attributes that should be hidden for serialization.
     *
     * @var array
     */
    protected $hidden = [
        'password',
        'remember_token',
    ];

    /**
     * The attributes that should be cast.
     *
     * @var array
     */
    protected $casts = [
        'email_verified_at' => 'datetime',
    ];

    /**
     * Write code on Method
     *
     * @return response()
     */
    public function generateCode()
    {
        $code = rand(1000, 9999);

        UserCode::updateOrCreate(
            [ 'user_id' => auth()->user()->id ],
            [ 'code' => $code ]
        );

        try {

            $details = [
                'title' => 'Mail from Nicesnippets.com',
                'code' => $code
            ];

            Mail::to(auth()->user()->email)->send(new SendCodeMail($details));

        } catch (Exception $e) {
            info("Error: ". $e->getMessage());
        }
    }
}
app/Models/UserCode.php
<?php

namespace App\Models;

use Illuminate\Database\Eloquent\Factories\HasFactory;
use Illuminate\Database\Eloquent\Model;

class UserCode extends Model
{
    use HasFactory;

    public $table = "user_codes";

    protected $fillable = [
        'user_id',
        'code',
    ];
}
Step 4: Create Auth Scaffold
In this section, we will utilize the Laravel UI package to create an authentication scaffold with the Bootstrap framework. Follow the commands below.
composer require laravel/ui
Now, execute the command to create the authentication scaffold.
php artisan ui bootstrap --auth
Step 5: Create Middleware
In this step, we will create a new middleware to check whether the user has 2FA enabled or not. Use the following command to generate the middleware and add the provided code.
php artisan make:middleware Check2FA
app/Http/Middleware/Check2FA.php
<?php

namespace App\Http\Middleware;

use Closure;
use Illuminate\Http\Request;
use Session;

class Check2FA
{
    /**
     * Handle an incoming request.
     *
     * @param  \Illuminate\Http\Request  $request
     * @param  \Closure  $next
     * @return mixed
     */
    public function handle(Request $request, Closure $next)
    {
        if (!Session::has('user_2fa')) {
            return redirect()->route('2fa.index');
        }

        return $next($request);
    }
}
app/Http/Kernel.php
<?php

namespace App\Http;

use Illuminate\Foundation\Http\Kernel as HttpKernel;

class Kernel extends HttpKernel
{
    ...
    ...
    ...

    protected $routeMiddleware = [
        'auth' => \App\Http\Middleware\Authenticate::class,
        'auth.basic' => \Illuminate\Auth\Middleware\AuthenticateWithBasicAuth::class,
        'cache.headers' => \Illuminate\Http\Middleware\SetCacheHeaders::class,
        'can' => \Illuminate\Auth\Middleware\Authorize::class,
        'guest' => \App\Http\Middleware\RedirectIfAuthenticated::class,
        'password.confirm' => \Illuminate\Auth\Middleware\RequirePassword::class,
        'signed' => \Illuminate\Routing\Middleware\ValidateSignature::class,
        'throttle' => \Illuminate\Routing\Middleware\ThrottleRequests::class,
        'verified' => \Illuminate\Auth\Middleware\EnsureEmailIsVerified::class,
        '2fa' => \App\Http\Middleware\Check2FA::class,
    ];
}
Step 6: Create Route
We now need to create register routes as shown below.
routes/web.php
<?php

use Illuminate\Support\Facades\Route;

/*
|--------------------------------------------------------------------------
| Web Routes
|--------------------------------------------------------------------------
|
| Here is where you can register web routes for your application. These
| routes are loaded by the RouteServiceProvider within a group which
| contains the "web" middleware group. Now create something great!
|
*/

Route::get('/', function () {
    return view('welcome');
});

Auth::routes();

Route::get('/home', [App\Http\Controllers\HomeController::class, 'index'])->name('home')->middleware('2fa');

Route::get('2fa', [App\Http\Controllers\TwoFAController::class, 'index'])->name('2fa.index');
Route::post('2fa', [App\Http\Controllers\TwoFAController::class, 'store'])->name('2fa.post');
Route::get('2fa/reset', [App\Http\Controllers\TwoFAController::class, 'resend'])->name('2fa.resend');
Step 7: Create and Update Controllers
In this section, we will update the LoginController controller file.
Additionally, we will create a new controller file named TwoFAController and write the necessary code there. Let's proceed to create these files.
app/Http/Controllers/Auth/LoginController.php
<?php

namespace App\Http\Controllers\Auth;

use App\Http\Controllers\Controller;
use App\Providers\RouteServiceProvider;
use Illuminate\Foundation\Auth\AuthenticatesUsers;
use Illuminate\Http\Request;
use Auth;
use App\Models\UserCode;

class LoginController extends Controller
{
    /*
    |--------------------------------------------------------------------------
    | Login Controller
    |--------------------------------------------------------------------------
    |
    | This controller handles authenticating users for the application and
    | redirecting them to your home screen. The controller uses a trait
    | to conveniently provide its functionality to your applications.
    |
    */

    use AuthenticatesUsers;

    /**
     * Where to redirect users after login.
     *
     * @var string
     */
    protected $redirectTo = RouteServiceProvider::HOME;

    /**
     * Create a new controller instance.
     *
     * @return void
     */
    public function __construct()
    {
        $this->middleware('guest')->except('logout');
    }

    /**
     * Write code on Method
     *
     * @return response()
     */
    public function login(Request $request)
    {
        $request->validate([
            'email' => 'required',
            'password' => 'required',
        ]);

        $credentials = $request->only('email', 'password');
        if (Auth::attempt($credentials)) {

            auth()->user()->generateCode();

            return redirect()->route('2fa.index');
        }

        return redirect("login")->withSuccess('Oppes! You have entered invalid credentials');
    }
}
app/Http/Controllers/TwoFAController.php
<?php

namespace App\Http\Controllers;

use Illuminate\Http\Request;
use Session;
use App\Models\UserCode;

class TwoFAController extends Controller
{
    /**
     * Write code on Method
     *
     * @return response()
     */
    public function index()
    {
        return view('2fa');
    }

    /**
     * Write code on Method
     *
     * @return response()
     */
    public function store(Request $request)
    {
        $request->validate([
            'code'=>'required',
        ]);

        $find = UserCode::where('user_id', auth()->user()->id)
                        ->where('code', $request->code)
                        ->where('updated_at', '>=', now()->subMinutes(2))
                        ->first();

        if (!is_null($find)) {
            Session::put('user_2fa', auth()->user()->id);
            return redirect()->route('home');
        }

        return back()->with('error', 'You entered wrong code.');
    }
    /**
     * Write code on Method
     *
     * @return response()
     */
    public function resend()
    {
        auth()->user()->generateCode();

        return back()->with('success', 'We sent you code on your email.');
    }
}
Step 8: Create Mail Class
In this step, we need to create a mail class and configure the email settings. Run the following command and update the respective files.
php artisan make:mail SendCodeMail
app/Mail/SendCodeMail.php
<?php

namespace App\Mail;

use Illuminate\Bus\Queueable;
use Illuminate\Contracts\Queue\ShouldQueue;
use Illuminate\Mail\Mailable;
use Illuminate\Queue\SerializesModels;

class SendCodeMail extends Mailable
{
    use Queueable, SerializesModels;

    public $details;

    /**
     * Create a new message instance.
     *
     * @return void
     */
    public function __construct($details)
    {
        $this->details = $details;
    }

    /**
     * Build the message.
     *
     * @return $this
     */
    public function build()
    {
        return $this->subject('Mail from Nicesnippets.com')
                    ->view('emails.code');
    }
}
.env
MAIL_DRIVER=smtp
MAIL_HOST=smtp.gmail.com
MAIL_PORT=587
MAIL_USERNAME=mygoogle@gmail.com
MAIL_PASSWORD=rrnnucvnqlbsl
MAIL_ENCRYPTION=tls
MAIL_FROM_ADDRESS=mygoogle@gmail.com
MAIL_FROM_NAME="${APP_NAME}"
Step 9: Create Blade File
In this section, we will create the code blade file and introduce a new 2fa blade file. Update the code as provided below.
resources/views/2fa.blade.php
@extends('layouts.app')

@section('content')
<div class="container">
    <div class="row justify-content-center">
        <div class="col-md-8">
            <div class="card">
                <div class="card-header">2FA Verification</div>

                <div class="card-body">
                    <form method="POST" action="{{ route('2fa.post') }}">
                        @csrf

                        <p class="text-center">We sent code to email : {{ substr(auth()->user()->email, 0, 5) . '******' . substr(auth()->user()->email,  -2) }}</p>
                        @if ($message = Session::get('success'))
                            <div class="row">
                              <div class="col-md-12">
                                  <div class="alert alert-success alert-block">
                                    <button type="button" class="close" data-dismiss="alert">×</button>
                                      <strong>{{ $message }}</strong>
                                  </div>
                              </div>
                            </div>
                        @endif

                        @if ($message = Session::get('error'))
                            <div class="row">
                              <div class="col-md-12">
                                  <div class="alert alert-danger alert-block">
                                    <button type="button" class="close" data-dismiss="alert">×</button>
                                      <strong>{{ $message }}</strong>
                                  </div>
                              </div>
                            </div>
                        @endif

                        <div class="form-group row">
                            <label for="code" class="col-md-4 col-form-label text-md-right">Code</label>

                            <div class="col-md-6">
                                <input id="code" type="number" class="form-control @error('code') is-invalid @enderror" name="code" value="{{ old('code') }}" required autocomplete="code" autofocus>

                                @error('code')
                                    <span class="invalid-feedback" role="alert">
                                        <strong>{{ $message }}</strong>
                                    </span>
                                @enderror
                            </div>
                        </div>

                        <div class="form-group row mb-0">
                            <div class="col-md-8 offset-md-4">
                                <a class="btn btn-link" href="{{ route('2fa.resend') }}">Resend Code?</a>
                            </div>
                        </div>

                        <div class="form-group row mb-0">
                            <div class="col-md-8 offset-md-4">
                                <button type="submit" class="btn btn-primary">
                                    Submit
                                </button>

                            </div>
                        </div>
                    </form>
                </div>
            </div>
        </div>
    </div>
</div>
@endsection
resources/views/emails/code.blade.php
<!DOCTYPE html>
<html>
<head>
    <title>Nicesnippets.com</title>
</head>
<body>
    <h1>{{ $details['title'] }}</h1>
    <p>Your code is : {{ $details['code'] }}</p>

    <p>Thank you</p>
</body>
</html>
Alright, now we are ready to proceed.
Now, let's run the project using the following command.
php artisan serve
open bellow UR.
localhost:8000/
Now you can simply run and check...
I hope it can help you....
#Laravel 10
