13-Jun-2024
.
Admin
Hi, Dev
In this post, I'll guide you through implementing API authentication using JWT tokens in a Laravel 11 application. We'll cover the fundamentals of APIs, JWT REST APIs, and Laravel JWT authentication, and we'll create a sample API to illustrate the concepts.
What is API?
An API (Application Programming Interface) is a method that enables communication between two or more computer programs.
APIs are also used for web and mobile application development; therefore, building a REST API is very essential for any web and mobile application developer.
What is JWT?
JWT stands for JSON Web Token, it is an open standard (RFC 7519) that defines a compact and self-contained way for securely transmitting information between parties as a JSON object. JWT is commonly used for Authorization, Information Exchange, etc.
In this example, we will start by installing the Laravel 11 application. Next, we will set up the API and integrate the `php-open-source-saver/jwt-auth` package to handle JWT authentication. Following this, we will create APIs for user registration, login, token refresh, profile access, and logout. Let's proceed step by step to complete this implementation:
Step for Laravel 11 JWT Authentication API Tutorial
Step 1: Install Laravel 11
Step 2: Enable API and Update Authentication Exception
Step 3: Install and Setup JWT Auth package
Step 4: Update User Model
Step 5: Create API Routes
Step 6: Create Controller Files
Run Laravel App
Follow the below few steps to create a restful API example in the laravel 11 app.
Step 1: Install Laravel 11
This step is not required; however, if you have not created the Laravel app, then you may go ahead and execute the below command:
composer create-project laravel/laravel example-app
Step 2: Enable API and Update Authentication Exception
By default, laravel 11 API route is not enabled in laravel 11. We will enable the API using the following command:
php artisan install:api
Now, if user is not authenticate then exception will call and we will return json response. so, let's update app.php file.
bootstrap/app.php
<?php

use Illuminate\Foundation\Application;
use Illuminate\Foundation\Configuration\Exceptions;
use Illuminate\Foundation\Configuration\Middleware;
use Illuminate\Auth\AuthenticationException;
use Illuminate\Http\Request;

return Application::configure(basePath: dirname(__DIR__))
    ->withRouting(
        web: __DIR__.'/../routes/web.php',
        api: __DIR__.'/../routes/api.php',
        commands: __DIR__.'/../routes/console.php',
        health: '/up',
    )
    ->withMiddleware(function (Middleware $middleware) {
        //
    })
    ->withExceptions(function (Exceptions $exceptions) {
        $exceptions->render(function (AuthenticationException $e, Request $request) {
            if ($request->is('api/*')) {
                return response()->json([
                    'message' => $e->getMessage(),
                ], 401);
            }
        });
    })->create();
Step 3: Install and Setup JWT Auth package
In this step, we will install php-open-source-saver/jwt-auth composer package.
composer require php-open-source-saver/jwt-auth
now, publish the package config file:
php artisan vendor:publish --provider="PHPOpenSourceSaver\JWTAuth\Providers\LaravelServiceProvider"
Next, generate a secret key. This will add JWT config values on .env file:
php artisan jwt:secret
now, we will update auth guard config file.
config/auth.php
<?php
return [

    /*
    |--------------------------------------------------------------------------
    | Authentication Defaults
    |--------------------------------------------------------------------------
    |
    | This option defines the default authentication "guard" and password
    | reset "broker" for your application. You may change these values
    | as required, but they're a perfect start for most applications.
    |
    */

    'defaults' => [
        'guard' => 'api',
        'passwords' => 'users',
    ],

    /*
    |--------------------------------------------------------------------------
    | Authentication Guards
    |--------------------------------------------------------------------------
    |
    | Next, you may define every authentication guard for your application.
    | Of course, a great default configuration has been defined for you
    | which utilizes session storage plus the Eloquent user provider.
    |
    | All authentication guards have a user provider, which defines how the
    | users are actually retrieved out of your database or other storage
    | system used by the application. Typically, Eloquent is utilized.
    |
    | Supported: "session"
    |
    */

    'guards' => [
        'web' => [
            'driver' => 'session',
            'provider' => 'users',
        ],
        'api' => [
            'driver' => 'jwt',
            'provider' => 'users',
        ],
    ],

    ...
Step 4: Update User Model
In the model, we implement first the Tymon\JWTAuth\Contracts\JWTSubject contract on the User Model and implement the getJWTIdentifier() and getJWTCustomClaims() methods.
app/Models/User.php
<?php

namespace App\Models;

use Illuminate\Database\Eloquent\Factories\HasFactory;
use Illuminate\Foundation\Auth\User as Authenticatable;
use Illuminate\Notifications\Notifiable;
use PHPOpenSourceSaver\JWTAuth\Contracts\JWTSubject;

class User extends Authenticatable implements JWTSubject
{
    use HasFactory, Notifiable;

    /**
     * The attributes that are mass assignable.
     *
     * @var array
     */
    protected $fillable = [
        'name',
        'email',
        'password',
    ];

    /**
     * The attributes that should be hidden for serialization.
     *
     * @var array
     */
    protected $hidden = [
        'password',
        'remember_token',
    ];

    /**
     * Get the attributes that should be cast.
     *
     * @return array
     */
    protected function casts(): array
    {
        return [
            'email_verified_at' => 'datetime',
            'password' => 'hashed',
        ];
    }

    /**
     * Get the identifier that will be stored in the subject claim of the JWT.
     *
     * @return mixed
     */
    public function getJWTIdentifier()
    {
        return $this->getKey();
    }

    /**
     * Return a key value array, containing any custom claims to be added to the JWT.
     *
     * @return array
     */
    public function getJWTCustomClaims()
    {
        return [];
    }
}
Step 5: Create API Routes
In this step, we will create API routes. Laravel provides the api.php file for writing web service routes. So, let's add a new route to that file.
routes/api.php
<?php

use Illuminate\Support\Facades\Route;

use App\Http\Controllers\API\AuthController;

Route::group([
    'middleware' => 'api',
    'prefix' => 'auth'
], function ($router) {
    Route::post('/register', [AuthController::class, 'register']);
    Route::post('/login', [AuthController::class, 'login']);
    Route::post('/logout', [AuthController::class, 'logout'])->middleware('auth:api');
    Route::post('/refresh', [AuthController::class, 'refresh'])->middleware('auth:api');
    Route::post('/profile', [AuthController::class, 'profile'])->middleware('auth:api');
});
Step 6: Create Controller Files
In the next step, we've created a new controller called BaseController and AuthController. I created a new folder named "API" in the Controllers folder because we'll have separate controllers for APIs. So, let's create both controllers:
app/Http/Controllers/API/BaseController.php
<?php

namespace App\Http\Controllers\API;

use Illuminate\Http\Request;
use App\Http\Controllers\Controller as Controller;

class BaseController extends Controller
{
    /**
     * success response method.
     *
     * @return \Illuminate\Http\Response
     */
    public function sendResponse($result, $message)
    {
    	$response = [
            'success' => true,
            'data'    => $result,
            'message' => $message,
        ];

        return response()->json($response, 200);
    }

    /**
     * return error response.
     *
     * @return \Illuminate\Http\Response
     */
    public function sendError($error, $errorMessages = [], $code = 404)
    {
    	$response = [
            'success' => false,
            'message' => $error,
        ];

        if(!empty($errorMessages)){
            $response['data'] = $errorMessages;
        }

        return response()->json($response, $code);
    }
}
app/Http/Controllers/API/AuthController.php
<?php

namespace App\Http\Controllers\API;

use App\Http\Controllers\API\BaseController as BaseController;
use App\Models\User;
use Validator;
use Illuminate\Http\Request;

class AuthController extends BaseController
{

    /**
     * Register a User.
     *
     * @return \Illuminate\Http\JsonResponse
     */
    public function register(Request $request) {

        $validator = Validator::make($request->all(), [
            'name' => 'required',
            'email' => 'required|email',
            'password' => 'required',
            'c_password' => 'required|same:password',
        ]);

        if($validator->fails()){
            return $this->sendError('Validation Error.', $validator->errors());
        }

        $input = $request->all();
        $input['password'] = bcrypt($input['password']);
        $user = User::create($input);
        $success['user'] =  $user;

        return $this->sendResponse($success, 'User register successfully.');
    }


    /**
     * Get a JWT via given credentials.
     *
     * @return \Illuminate\Http\JsonResponse
     */
    public function login()
    {
        $credentials = request(['email', 'password']);

        if (! $token = auth()->attempt($credentials)) {
            return $this->sendError('Unauthorised.', ['error'=>'Unauthorised']);
        }

        $success = $this->respondWithToken($token);

        return $this->sendResponse($success, 'User login successfully.');
    }

    /**
     * Get the authenticated User.
     *
     * @return \Illuminate\Http\JsonResponse
     */
    public function profile()
    {
        $success = auth()->user();

        return $this->sendResponse($success, 'Refresh token return successfully.');
    }

    /**
     * Log the user out (Invalidate the token).
     *
     * @return \Illuminate\Http\JsonResponse
     */
    public function logout()
    {
        auth()->logout();

        return $this->sendResponse([], 'Successfully logged out.');
    }

    /**
     * Refresh a token.
     *
     * @return \Illuminate\Http\JsonResponse
     */
    public function refresh()
    {
        $success = $this->respondWithToken(auth()->refresh());

        return $this->sendResponse($success, 'Refresh token return successfully.');
    }

    /**
     * Get the token array structure.
     *
     * @param  string $token
     *
     * @return \Illuminate\Http\JsonResponse
     */
    protected function respondWithToken($token)
    {
        return [
            'access_token' => $token,
            'token_type' => 'bearer',
            'expires_in' => auth()->factory()->getTTL() * 60
        ];
    }
}
Run Laravel App:
All the required steps have been done, now you have to type the given below command and hit enter to run the Laravel app:
php artisan serve
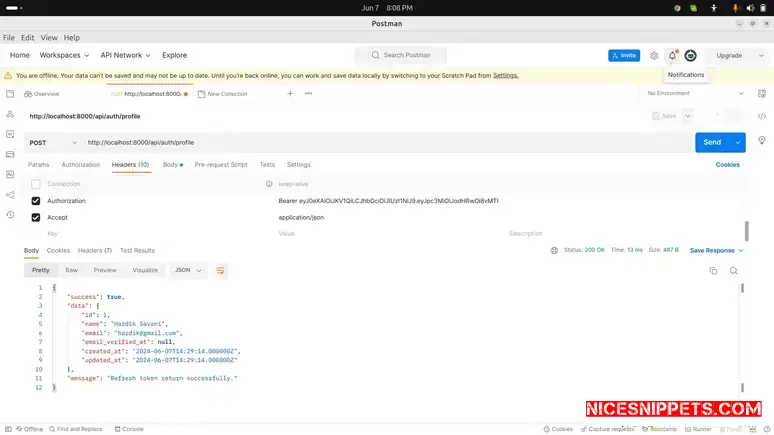
make sure in details api we will use following headers as listed bellow:
'headers' => [
    'Accept' => 'application/json',
    'Authorization' => 'Bearer '.$accessToken,
]
Here is Routes URL with Verb:
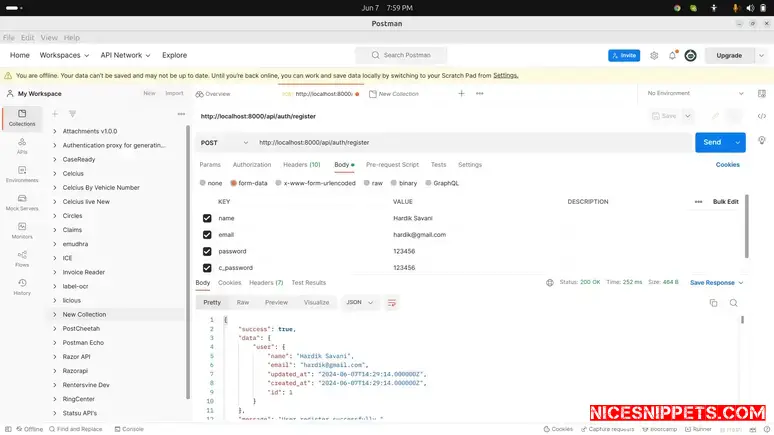
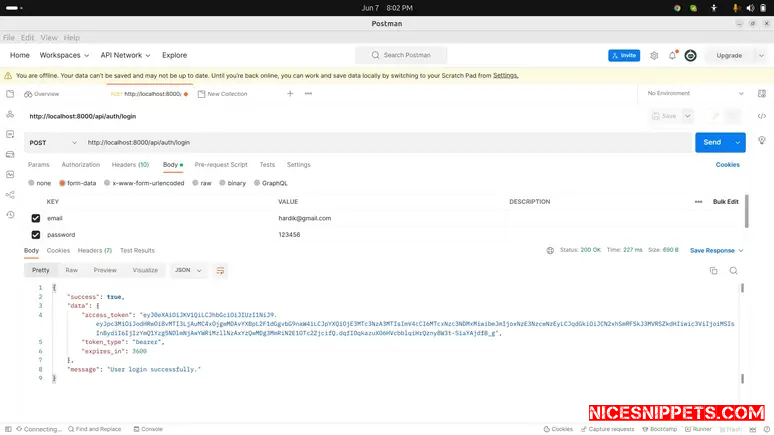
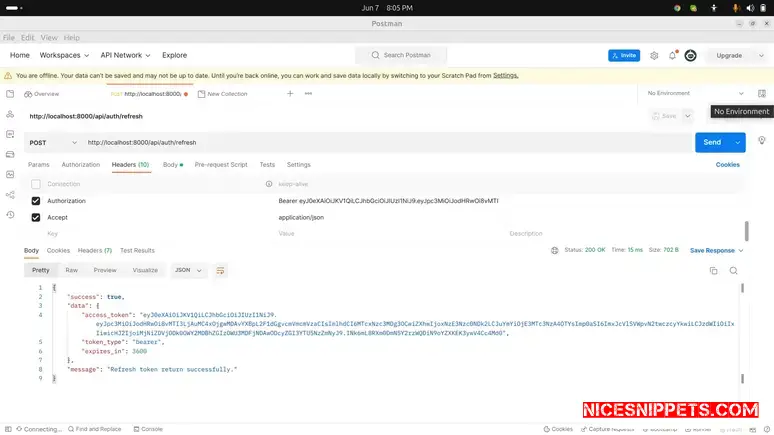
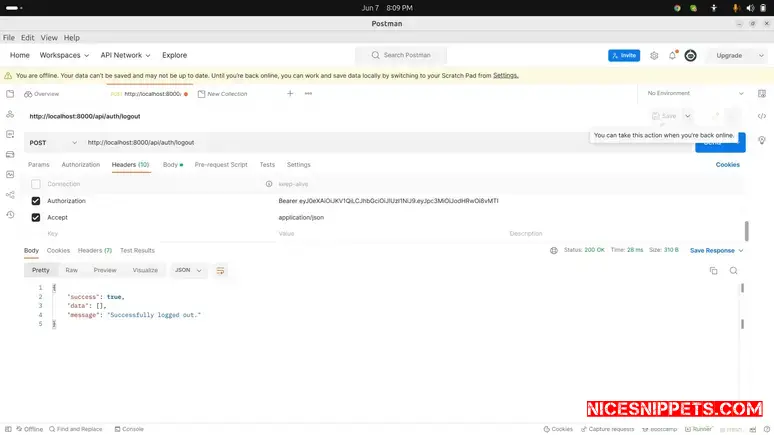
Now simply you can run above listed url like as bellow screen shot:
1) Register API: Verb:POST, URL:http://localhost:8000/api/auth/register
2) Login API: Verb:POST, URL:http://localhost:8000/api/auth/login
3) Profile API: Verb:POST, URL:http://localhost:8000/api/auth/profile
4) Refresh API: Verb:POST, URL:http://localhost:8000/api/auth/refresh
5) Logout API: Verb:POST, URL:http://localhost:8000/api/auth/logout
I hope it can help you...
#Laravel 11
