14-Mar-2024
.
Admin

Hi, Dev
Hello there! Welcome to this tutorial where I'll guide you through a comprehensive example of Laravel 11 CRUD operations.
CRUD, an acronym in computer programming, stands for Create, Read, Update, and Delete. These operations are fundamental for implementing persistent storage in your application.
In this tutorial, we'll be building a CRUD application for managing products using Laravel 11. Here's an overview of the steps we'll follow:
Step for Laravel 11 CRUD Operation Example
Step 1: Install Laravel 11
Step 2: MySQL Database Configuration
Step 3: Create Migration
Step 4: Create Form Request Validation Class
Step 5: Create Controller and Model
Step 6: Add Resource Route
Step 7: Update AppServiceProvider
Step 8: Add Blade Files
Run Laravel App
Step 1: Install Laravel 11
First of all, we need to get a fresh Laravel 11 version application using the command below because we are starting from scratch. So, open your terminal or command prompt and run the command below:
composer create-project laravel/laravel example-app
Step 2: MySQL Database Configuration
In Laravel 11, there is a default database connection using SQLite, but if we want to use MySQL instead, we need to add a MySQL connection with the database name, username, and password to the `.env` file.
.env
DB_CONNECTION=mysql
DB_HOST=127.0.0.1
DB_PORT=3306
DB_DATABASE=here your database name(blog)
DB_USERNAME=here database username(root)
DB_PASSWORD=here database password(root)
Step 3: Create Migration
In the third step, we will create a "products" table with "name" and "details" columns using Laravel migration. So, let's use the following command to create a migration file:
php artisan make:migration create_products_table --create=products
After executing the above command, you will find a file in the following path: "database/migrations". You have to put the code below in your migration file to create the products table.
<?php

use Illuminate\Database\Migrations\Migration;
use Illuminate\Database\Schema\Blueprint;
use Illuminate\Support\Facades\Schema;

return new class extends Migration
{
    /**
     * Run the migrations.
     */
    public function up(): void
    {
        Schema::create('products', function (Blueprint $table) {
            $table->id();
            $table->string('name');
            $table->text('detail');
            $table->timestamps();
        });
    }

    /**
     * Reverse the migrations.
     */
    public function down(): void
    {
        Schema::dropIfExists('products');
    }
};
Now you have to run this migration by the following command:
php artisan migrate
Step 4: Create Form Request Validation Class
In this step, we will create a form request validation class for the `store()` and `update()` methods in the controller. In this class, we will define validation rules and use it in the controller file. So, let's create it.
php artisan make:request ProductStoreRequest
Just put the below code in your request class:
app/Http/Requests/ProductStoreRequest.php
<?php

namespace App\Http\Requests;

use Illuminate\Foundation\Http\FormRequest;

class ProductStoreRequest extends FormRequest
{
    /**
     * Determine if the user is authorized to make this request.
     */
    public function authorize(): bool
    {
        return true;
    }

    /**
     * Get the validation rules that apply to the request.
     *
     * @return array|string>
     */
    public function rules(): array
    {
        return [
            'name' => 'required',
            'detail' => 'required'
        ];
    }
}
Now, let's do the same thing for the Update Request Class.
php artisan make:request ProductUpdateRequest
Just put the below code in your request class:
app/Http/Requests/ProductUpdateRequest.php
<?php

namespace App\Http\Requests;

use Illuminate\Foundation\Http\FormRequest;

class ProductUpdateRequest extends FormRequest
{
    /**
     * Determine if the user is authorized to make this request.
     */
    public function authorize(): bool
    {
        return true;
    }

    /**
     * Get the validation rules that apply to the request.
     *
     * @return array|string>
     */
    public function rules(): array
    {
        return [
            'name' => 'required',
            'detail' => 'required'
        ];
    }
}
Step 5: Create Controller and Model
In this step, now we should create a new resource controller named ProductController. So run the below command to create the new controller. Below is the controller for creating the resource controller.
artisan make:controller ProductController --resource --model=Product
After the following command, you will find a new file at this path:
app/Http/Controllers/ProductController.php
In this controller, seven methods will be created by default as follows:
1)index()
2)create()
3)store()
4)show()
5)edit()
6)update()
7)destroy()
So, let's copy the code below and put it in the ProductController.php file.
app/Http/Controllers/ProductController.php
<?php

namespace App\Http\Controllers;

use App\Models\Product;
use Illuminate\Http\RedirectResponse;
use Illuminate\Http\Request;
use Illuminate\Http\Response;
use Illuminate\View\View;
use App\Http\Requests\ProductStoreRequest;
use App\Http\Requests\ProductUpdateRequest;

class ProductController extends Controller
{
    /**
     * Display a listing of the resource.
     */
    public function index(): View
    {
        $products = Product::latest()->paginate(5);

        return view('products.index', compact('products'))
                    ->with('i', (request()->input('page', 1) - 1) * 5);
    }

    /**
     * Show the form for creating a new resource.
     */
    public function create(): View
    {
        return view('products.create');
    }

    /**
     * Store a newly created resource in storage.
     */
    public function store(ProductStoreRequest $request): RedirectResponse
    {
        Product::create($request->validated());

        return redirect()->route('products.index')
                         ->with('success', 'Product created successfully.');
    }

    /**
     * Display the specified resource.
     */
    public function show(Product $product): View
    {
        return view('products.show',compact('product'));
    }

    /**
     * Show the form for editing the specified resource.
     */
    public function edit(Product $product): View
    {
        return view('products.edit',compact('product'));
    }

    /**
     * Update the specified resource in storage.
     */
    public function update(ProductUpdateRequest $request, Product $product): RedirectResponse
    {
        $product->update($request->validated());

        return redirect()->route('products.index')
                        ->with('success','Product updated successfully');
    }

    /**
     * Remove the specified resource from storage.
     */
    public function destroy(Product $product): RedirectResponse
    {
        $product->delete();

        return redirect()->route('products.index')
                        ->with('success','Product deleted successfully');
    }
}
So, let's update the Product model code as follows:
app/Models/Product.php
<?php

namespace App\Models;

use Illuminate\Database\Eloquent\Factories\HasFactory;
use Illuminate\Database\Eloquent\Model;

class Product extends Model
{
    use HasFactory;

    protected $fillable = [
        'name',
        'detail',
    ];
}
Step 6: Add Resource Route
Here, we need to add a resource route for the product CRUD application. So, open your `routes/web.php` file and add the following route.
routes/web.php
<?php

use Illuminate\Support\Facades\Route;

use App\Http\Controllers\ProductController;

Route::get('/', function () {
    return view('welcome');
});

Route::resource('products', ProductController::class);
Step 7: Update AppServiceProvider
Here, we will use bootstrap 5 for pagination. so, we need to import it on AppServiceProvider.php file. let's update it.
app/Provides/AppServiceProvider.php
<?php

namespace App\Providers;

use Illuminate\Support\ServiceProvider;
use Illuminate\Pagination\Paginator;

class AppServiceProvider extends ServiceProvider
{
    /**
     * Register any application services.
     */
    public function register(): void
    {

    }

    /**
     * Bootstrap any application services.
     */
    public function boot(): void
    {
        Paginator::useBootstrapFive();
    }
}
Step 8: Add Blade Files
In the last step, we need to create only blade files. So, primarily, we have to create a layout file and then a new folder called "products." After that, we create blade files for the CRUD app. So, finally, you have to create the following blade files below:
1) layout.blade.php
2) index.blade.php
3) create.blade.php
4) edit.blade.php
5) show.blade.php
So let's just create the following file and put the code below in it.
resources/views/products/layout.blade.php
<!DOCTYPE html>
<html>
<head>
    <title>Laravel 11 CRUD Application - NiceSnippets.com</title>
    <link href="https://cdn.jsdelivr.net/npm/bootstrap@5.3.2/dist/css/bootstrap.min.css" rel="stylesheet">
    <link rel="stylesheet" href="https://cdnjs.cloudflare.com/ajax/libs/font-awesome/6.5.1/css/all.min.css" />
</head>
<body>

<div class="container">
    @yield('content')
</div>

</body>
</html>
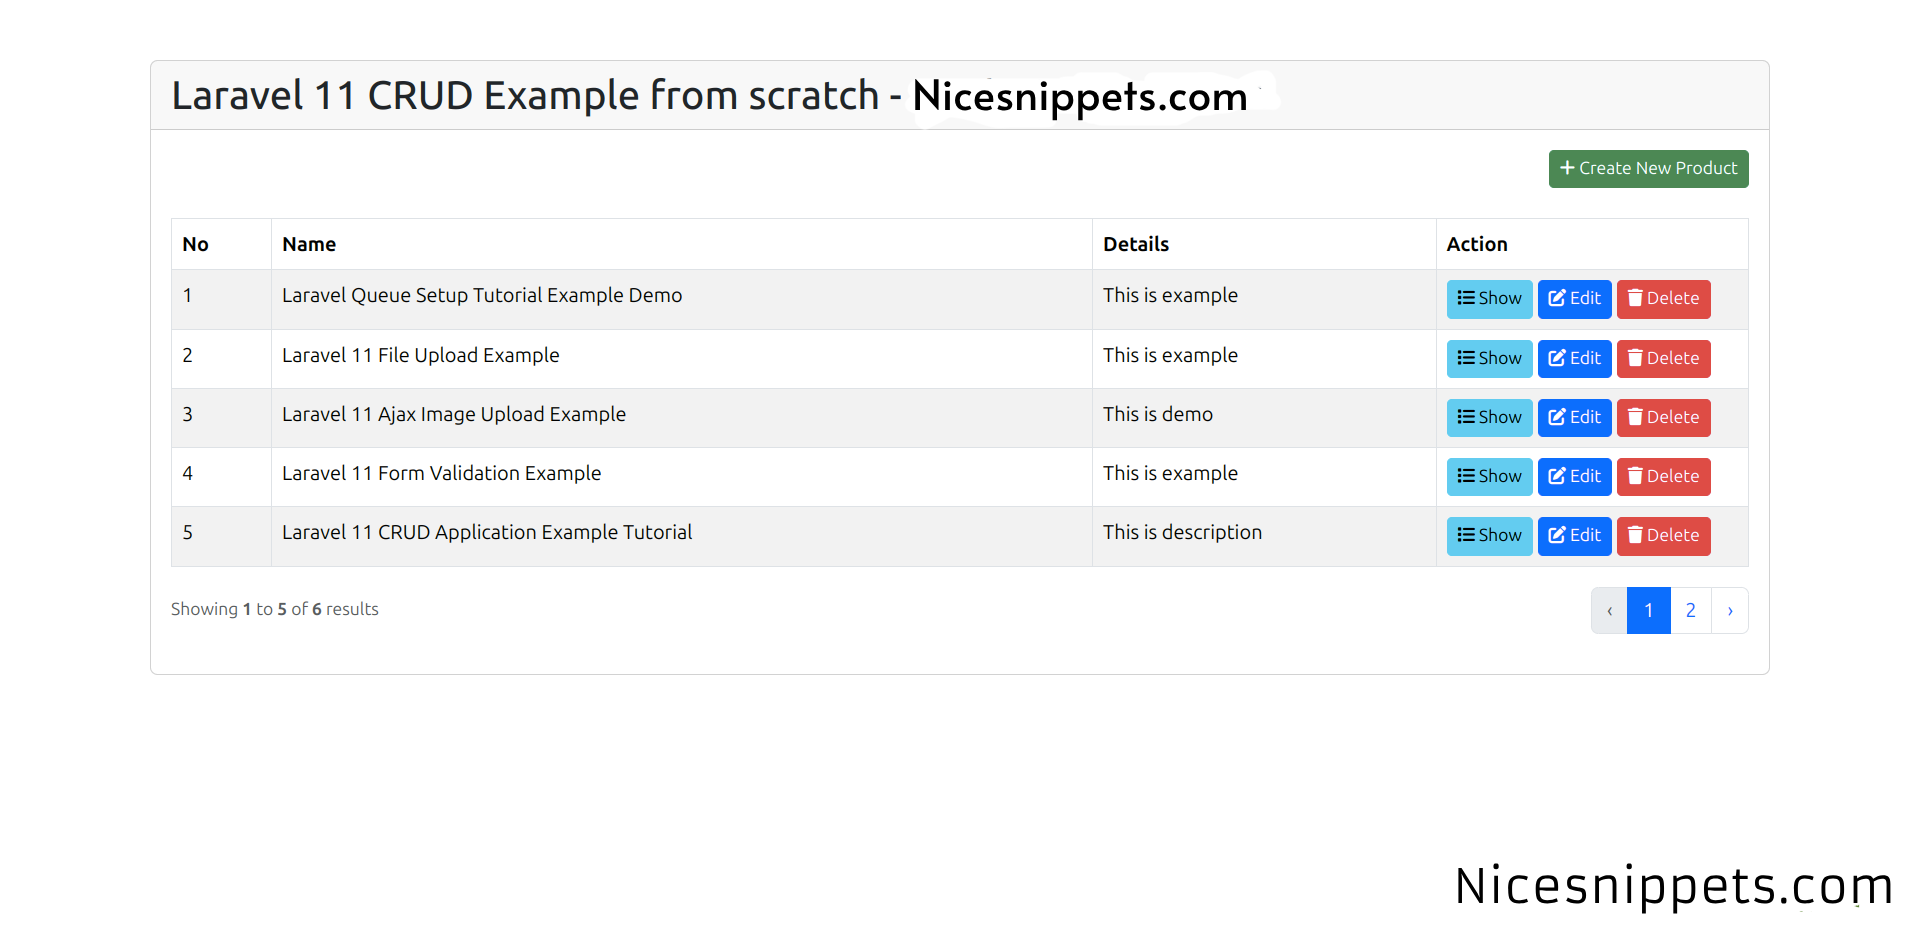
resources/views/products/index.blade.php
@extends('products.layout')

@section('content')

<div class="card mt-5">
  <h2 class="card-header">Laravel 11 CRUD Example from scratch - NiceSnippets.com</h2>
  <div class="card-body">

        @session('success')
            <div class="alert alert-success" role="alert"> {{ $value }} </div>
        @endsession

        <div class="d-grid gap-2 d-md-flex justify-content-md-end">
            <a class="btn btn-success btn-sm" href="{{ route('products.create') }}"> <i class="fa fa-plus"></i> Create New Product</a>
        </div>

        <table class="table table-bordered table-striped mt-4">
            <thead>
                <tr>
                    <th width="80px">No</th>
                    <th>Name</th>
                    <th>Details</th>
                    <th width="250px">Action</th>
                </tr>
            </thead>
            <tbody>
            @forelse ($products as $product)
                <tr>
                    <td>{{ ++$i }}</td>
                    <td>{{ $product->name }}</td>
                    <td>{{ $product->detail }}</td>
                    <td>
                        <form action="{{ route('products.destroy',$product->id) }}" method="POST">

                            <a class="btn btn-info btn-sm" href="{{ route('products.show',$product->id) }}"><i class="fa-solid fa-list"></i> Show</a>

                            <a class="btn btn-primary btn-sm" href="{{ route('products.edit',$product->id) }}"><i class="fa-solid fa-pen-to-square"></i> Edit</a>

                            @csrf
                            @method('DELETE')

                            <button type="submit" class="btn btn-danger btn-sm"><i class="fa-solid fa-trash"></i> Delete</button>
                        </form>
                    </td>
                </tr>
            @empty
                <tr>
                    <td colspan="4">There are no data.</td>
                </tr>
            @endforelse
            </tbody>

        </table>

        {!! $products->links() !!}

  </div>
</div>
@endsection
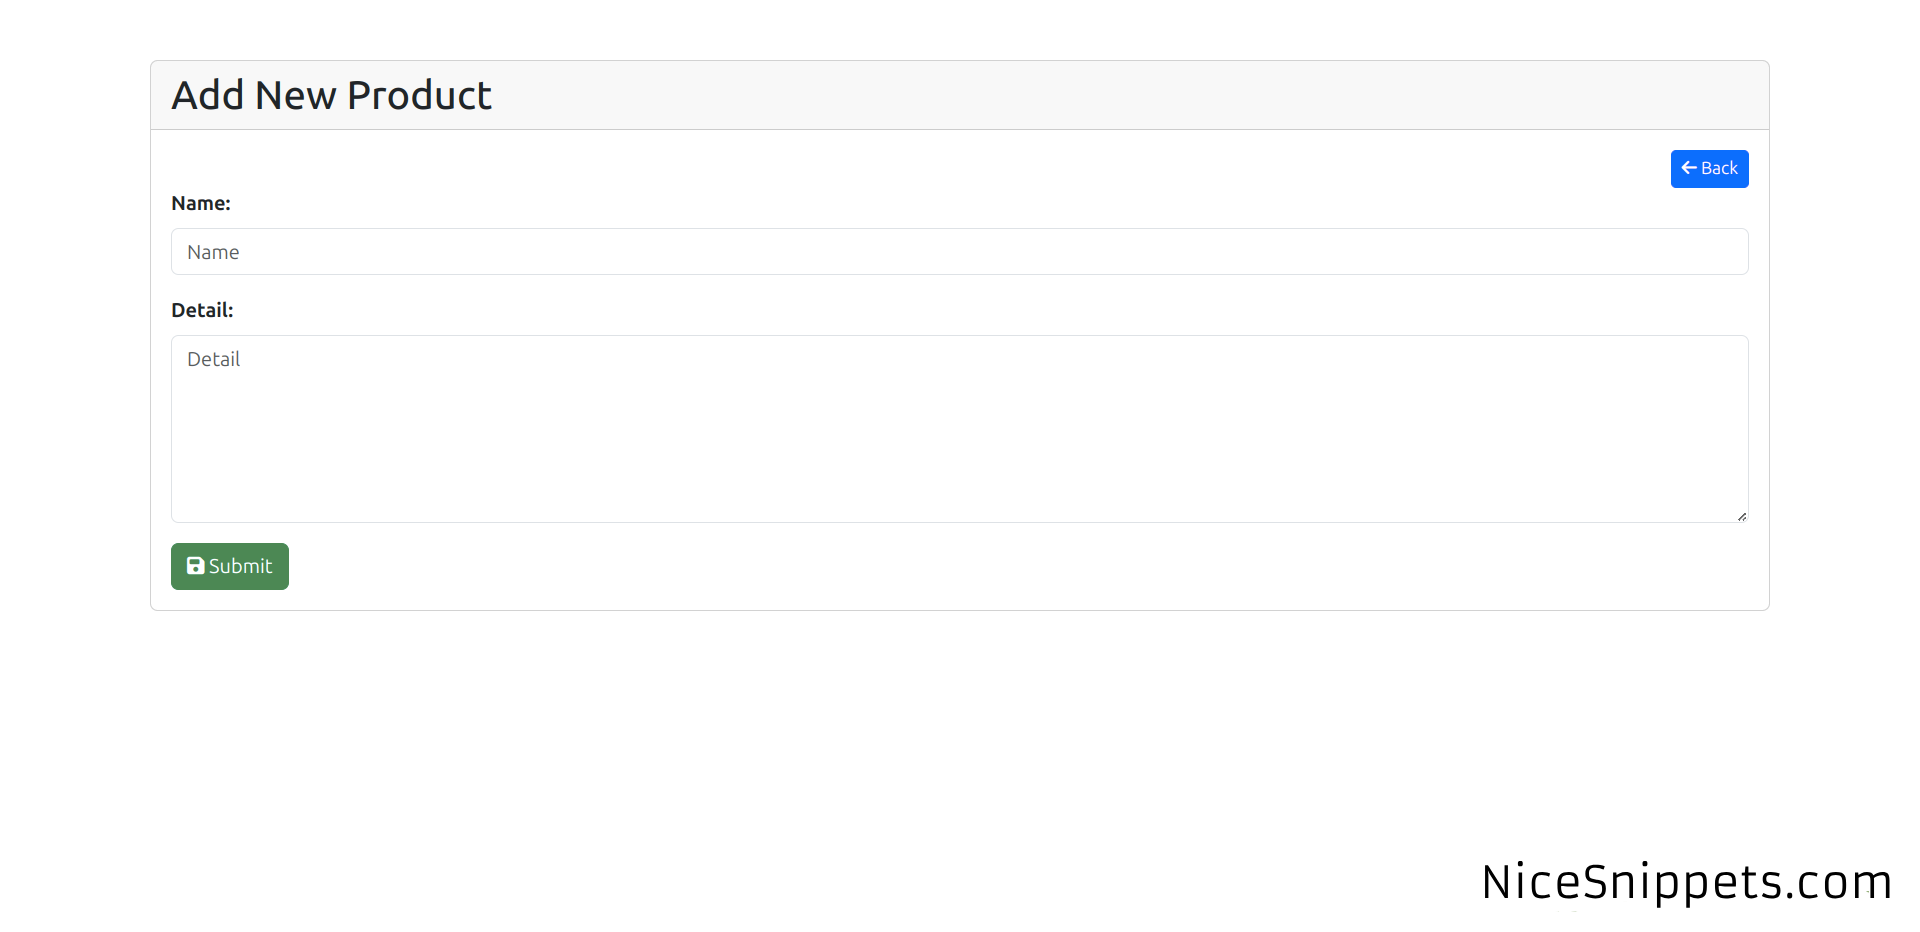
resources/views/products/create.blade.php
@extends('products.layout')

@section('content')

<div class="card mt-5">
  <h2 class="card-header">Add New Product</h2>
  <div class="card-body">

    <div class="d-grid gap-2 d-md-flex justify-content-md-end">
        <a class="btn btn-primary btn-sm" href="{{ route('products.index') }}"><i class="fa fa-arrow-left"></i> Back</a>
    </div>

    <form action="{{ route('products.store') }}" method="POST">
        @csrf

        <div class="mb-3">
            <label for="inputName" class="form-label"><strong>Name:</strong></label>
            <input
                type="text"
                name="name"
                class="form-control @error('name') is-invalid @enderror"
                id="inputName"
                placeholder="Name">
            @error('name')
                <div class="form-text text-danger">{{ $message }}</div>
            @enderror
        </div>

        <div class="mb-3">
            <label for="inputDetail" class="form-label"><strong>Detail:</strong></label>
            <textarea
                class="form-control @error('detail') is-invalid @enderror"
                style="height:150px"
                name="detail"
                id="inputDetail"
                placeholder="Detail"></textarea>
            @error('detail')
                <div class="form-text text-danger">{{ $message }}</div>
            @enderror
        </div>
        <button type="submit" class="btn btn-success"><i class="fa-solid fa-floppy-disk"></i> Submit</button>
    </form>

  </div>
</div>
@endsection
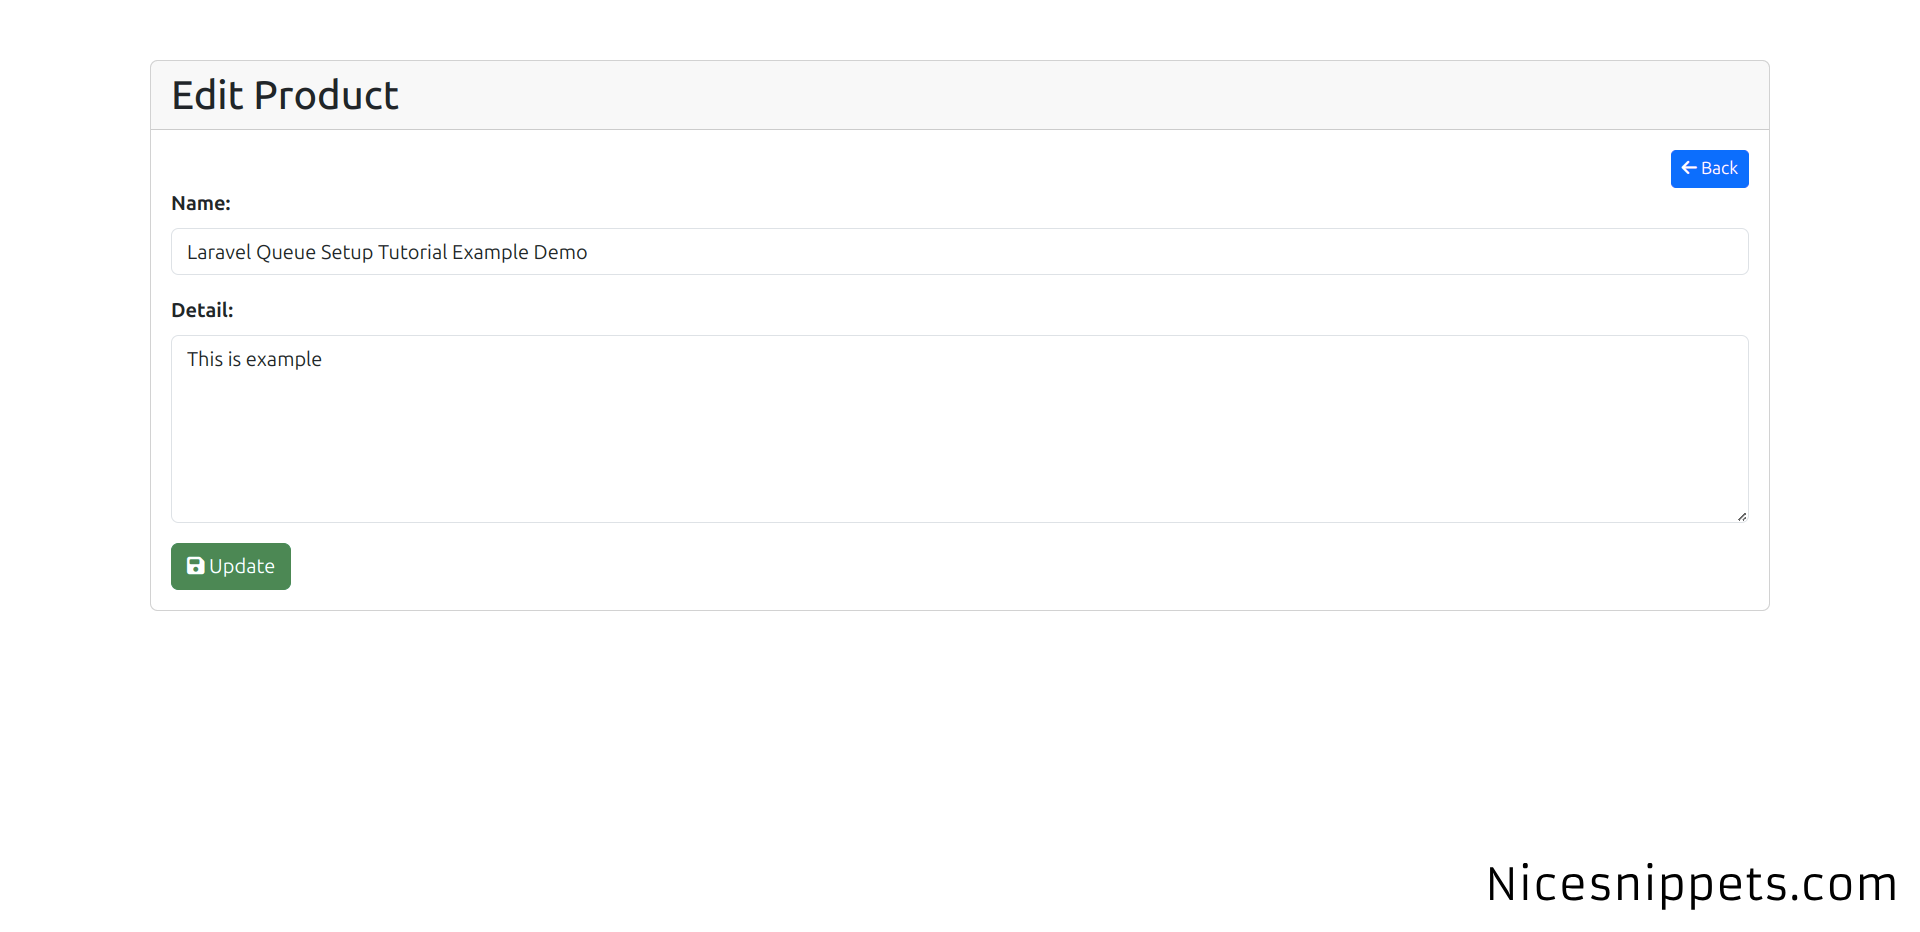
resources/views/products/edit.blade.php
@extends('products.layout')

@section('content')

<div class="card mt-5">
  <h2 class="card-header">Edit Product</h2>
  <div class="card-body">

    <div class="d-grid gap-2 d-md-flex justify-content-md-end">
        <a class="btn btn-primary btn-sm" href="{{ route('products.index') }}"><i class="fa fa-arrow-left"></i> Back</a>
    </div>

    <form action="{{ route('products.update',$product->id) }}" method="POST">
        @csrf
        @method('PUT')

        <div class="mb-3">
            <label for="inputName" class="form-label"><strong>Name:</strong></label>
            <input
                type="text"
                name="name"
                value="{{ $product->name }}"
                class="form-control @error('name') is-invalid @enderror"
                id="inputName"
                placeholder="Name">
            @error('name')
                <div class="form-text text-danger">{{ $message }}</div>
            @enderror
        </div>

        <div class="mb-3">
            <label for="inputDetail" class="form-label"><strong>Detail:</strong></label>
            <textarea
                class="form-control @error('detail') is-invalid @enderror"
                style="height:150px"
                name="detail"
                id="inputDetail"
                placeholder="Detail">{{ $product->detail }}</textarea>
            @error('detail')
                <div class="form-text text-danger">{{ $message }}</div>
            @enderror
        </div>
        <button type="submit" class="btn btn-success"><i class="fa-solid fa-floppy-disk"></i> Update</button>
    </form>

  </div>
</div>
@endsection
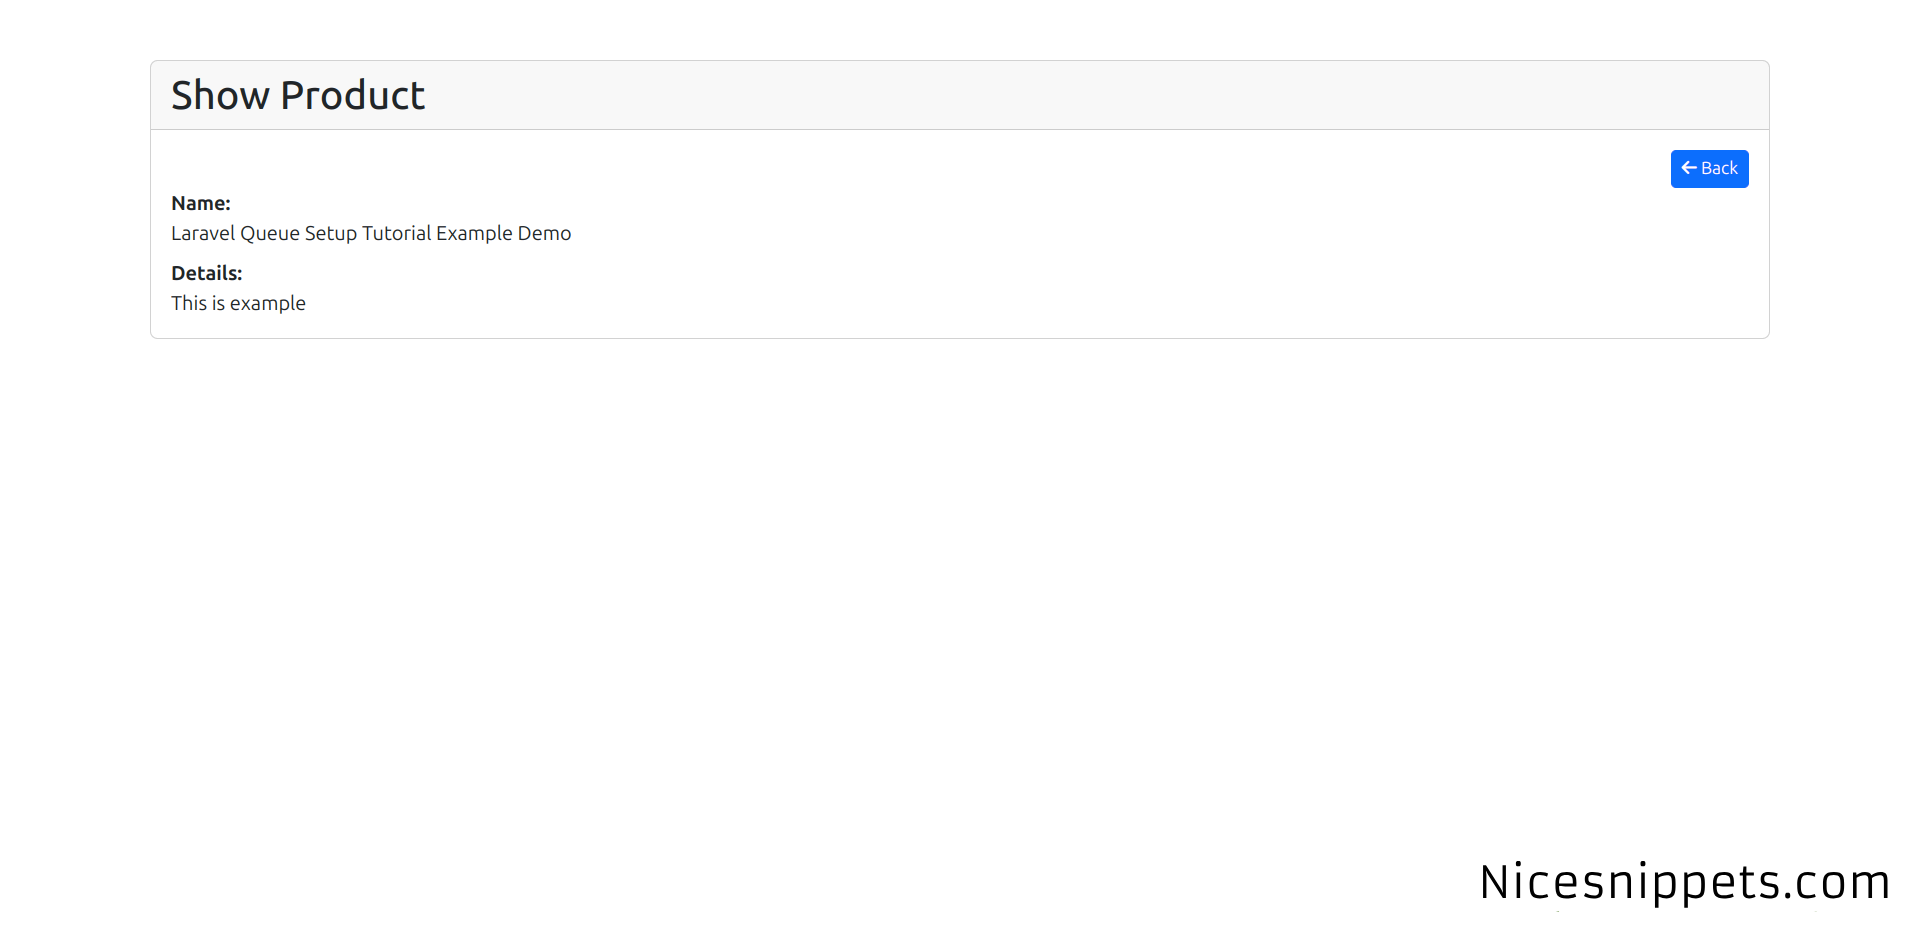
resources/views/products/show.blade.php
@extends('products.layout')

@section('content')

<div class="card mt-5">
  <h2 class="card-header">Show Product</h2>
  <div class="card-body">

    <div class="d-grid gap-2 d-md-flex justify-content-md-end">
        <a class="btn btn-primary btn-sm" href="{{ route('products.index') }}"><i class="fa fa-arrow-left"></i> Back</a>
    </div>

    <div class="row">
        <div class="col-xs-12 col-sm-12 col-md-12">
            <div class="form-group">
                <strong>Name:</strong> <br/>
                {{ $product->name }}
            </div>
        </div>
        <div class="col-xs-12 col-sm-12 col-md-12 mt-2">
            <div class="form-group">
                <strong>Details:</strong> <br/>
                {{ $product->detail }}
            </div>
        </div>
    </div>

  </div>
</div>
@endsection
Run Laravel App:
All the required steps have been done, now you have to type the given below command and hit enter to run the Laravel app:
php artisan serve
Now, Go to your web browser, type the given URL and view the app output:
http://localhost:8000/products
You will see layout bellow:
List Page:
Add Page:
Edit Page:
Show Page:
You can download code from git:
I hope it can help you...
#Laravel 11
