04-Apr-2023
.
Admin

Hi Guys,
This article will provide some of the most important example how to use stack with drawer navigation in react native. I explained simply step by step how to implement stack with drawer navigation in react native. this example will help you stack with drawer navigation example in react native. it's simple example of react native stack with drawer navigation example. So, let's follow few step to create example of how to create stack with drawer navigation in react native.
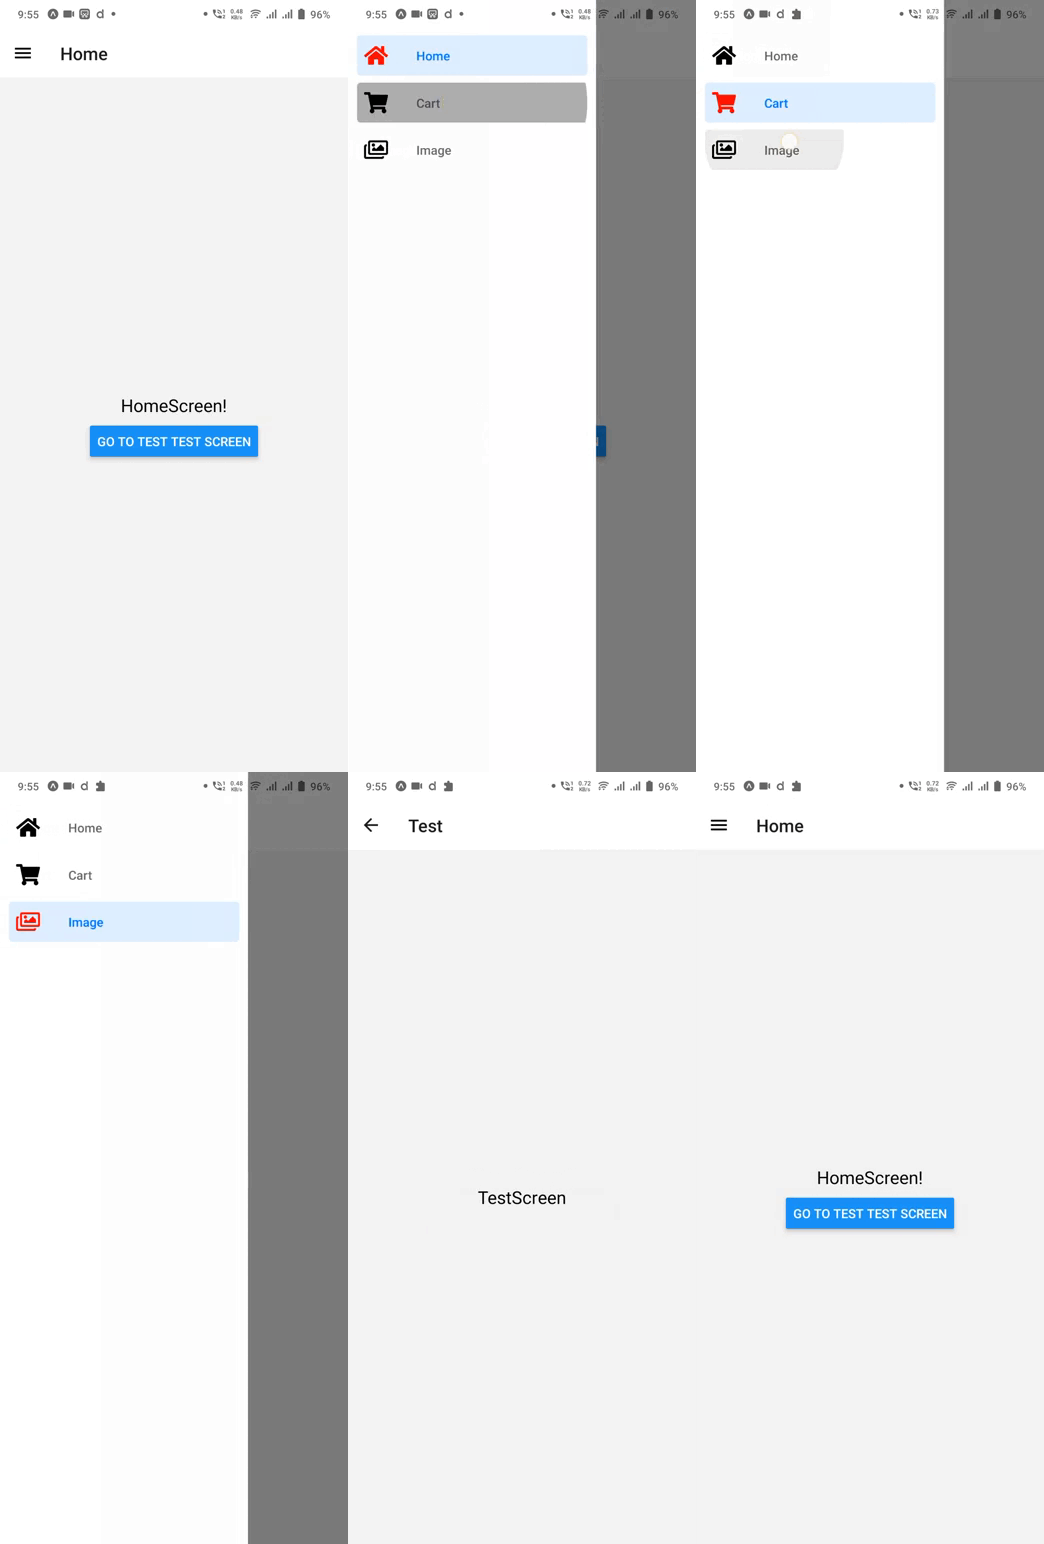
In this example, there are 3 screens (Home, Cart, and Image) defined using the Drawer.Screen component and 1 screen (Test) defined using the Stack.screen component. Similarly, you can define as many screens as you like.
Step 1: Download Project
In the first step run the following command to create a project.
expo init ExampleApp
Step 2: Installation and Setup
First, you need to install them in your project:
npm install @react-navigation/native @react-navigation/stack @react-navigation/drawer
You also need to install react-native-gesture-handler,react-native-reanimated and react-native-screens .
npm install react-native-gesture-handler react-native-reanimated react-native-screens
you can set drawer icon to install vector icons:
npm i react-native-vector-icons
you have use any bundled Icon:
import this:
import Icon from 'react-native-vector-icons/FontAwesome5';
Step 3: HomeScreen.js
first of all you have create Screens folder inside your project.in this folder create HomeScreen.js file
In this step, You will open the HomeScreen.js file and put the code.
Screens/HomeScreen.js
import React from 'react';
import { StyleSheet, Text, View, Button } from 'react-native';

const HomeScreen = (props) => {

    const gotoTestStackScreen = () => {
        props.navigation.navigate('Test');
    };

    return (
        <View style={styles.container}>
            <View>
                <Text style={styles.text}>HomeScreen!</Text>
            </View>
            <Button title="Go to test test screen" onPress={gotoTestStackScreen} />
        </View>
    );
}

const styles = StyleSheet.create({
    container: {
        flex: 1,
        justifyContent: 'center',
        alignItems: 'center',
    },
    text: {
        fontSize: 20,
        marginBottom: 10,
    },
});

export default HomeScreen;
Step 4: CartScreen.js
Next,create CartScreen.js file inside Screens folder
In this step, You will open the CartScreen.js file and put the code.
Screens/CartScreen.js
import React from 'react';
import { StyleSheet, Text, View } from 'react-native';

const CartScreen = () => {
    return (
        <View style={styles.container}>
            <Text style={styles.text}>CartScreen</Text>
        </View>
    );
}

const styles = StyleSheet.create({
    container: {
        flex: 1,
        justifyContent: 'center',
        alignItems: 'center',
    },
    text: {
        fontSize: 20,
    },
});

export default CartScreen;
Step 5: ImageScreen.js
Next,create ImageScreen.js file inside Screens folder
In this step, You will open the ImageScreen.js file and put the code.
Screens/ImageScreen.js
import React from 'react';
import { StyleSheet, Text, View } from 'react-native';

const ImageScreen = () => {
    return (
        <View style={styles.container}>
            <Text style={styles.text}>ImageScreen</Text>
        </View>
    );
}

const styles = StyleSheet.create({
    container: {
        flex: 1,
        justifyContent: 'center',
        alignItems: 'center',
    },
    text: {
        fontSize: 20,
    },
});

export default ImageScreen;
Step 6: TestScreen.js
Next,create TestScreen.js file inside Screens folder
In this step, You will open the TestScreen.js file and put the code.
Screens/TestScreen.js
import React from 'react';
import { StyleSheet, Text, View } from 'react-native';

const TestScreen = () => {
    return (
        <View style={styles.container}>
            <Text style={styles.text}>TestScreen</Text>
        </View>
    );
}

const styles = StyleSheet.create({
    container: {
        flex: 1,
        justifyContent: 'center',
        alignItems: 'center',
    },
    text: {
        fontSize: 20,
    },
});

export default TestScreen;
Step 7: App.js
Now, you need to wrap the whole app in NavigationContainer. Usually, you'd do this in your entry file, such as App.js:
In this step, You will open the App.js file and put the code.
import * as React from 'react';
import { NavigationContainer } from '@react-navigation/native';
import { createStackNavigator } from '@react-navigation/stack';
import { createDrawerNavigator } from '@react-navigation/drawer';
import Icon from 'react-native-vector-icons/FontAwesome5';

import HomeScreen from './Screens/HomeScreen';
import CartScreen from './Screens/CartScreen';
import ImageScreen from './Screens/ImageScreen';
import TestScreen from './Screens/TestScreen';

const Drawer = createDrawerNavigator();

const MyTabs = () => {
    return (
        <Drawer.Navigator>
            <Drawer.Screen
                name='Home'
                component={HomeScreen}
                options={{
                    drawerIcon: ({ focused, size }) => (
                        <Icon
                            name="home"
                            size={size}
                            color={focused ? 'red' : 'black'}
                        />
                    ),
                }}
            />
            <Drawer.Screen
                name='Cart'
                component={CartScreen}
                options={{
                    drawerIcon: ({ focused, size }) => (
                        <Icon
                            name="shopping-cart"
                            size={size}
                            color={focused ? 'red' : 'black'}
                        />
                    ),
                }}
            />
            <Drawer.Screen
                name='Image'
                component={ImageScreen}
                options={{
                    drawerIcon: ({ focused, size }) => (
                        <Icon
                            name="images"
                            size={size}
                            color={focused ? 'red' : 'black'}
                        />
                    ),
                }}
            />
        </Drawer.Navigator>
    );
}

const Stack = createStackNavigator();

const App = () => {
    return (
        <NavigationContainer>
            <Stack.Navigator
                initialRouteName="Tabs"
                screenOptions={{
                    headerShown: false,
                }}
            >
                <Stack.Screen
                    name="Test"
                    component={TestScreen}
                    options={{
                        headerShown: true,
                        headerTitle: 'Test',
                    }}
                />
                <Stack.Screen name="Tabs" component={MyTabs} />
            </Stack.Navigator>
        </NavigationContainer>
    );
}

export default App;
Run Project
In the last step run your project using the below command.
expo start
You can QR code scan in Expo Go Application on mobile.
Output :

It will help you...
#React Native