10-Apr-2023
.
Admin
Hi Guys,
In this tutorial,I will create very simple example of Ajax autocomplete search in Laravel 7/6. You can easily make text box field autocomplete in Laravel 7/6 application.
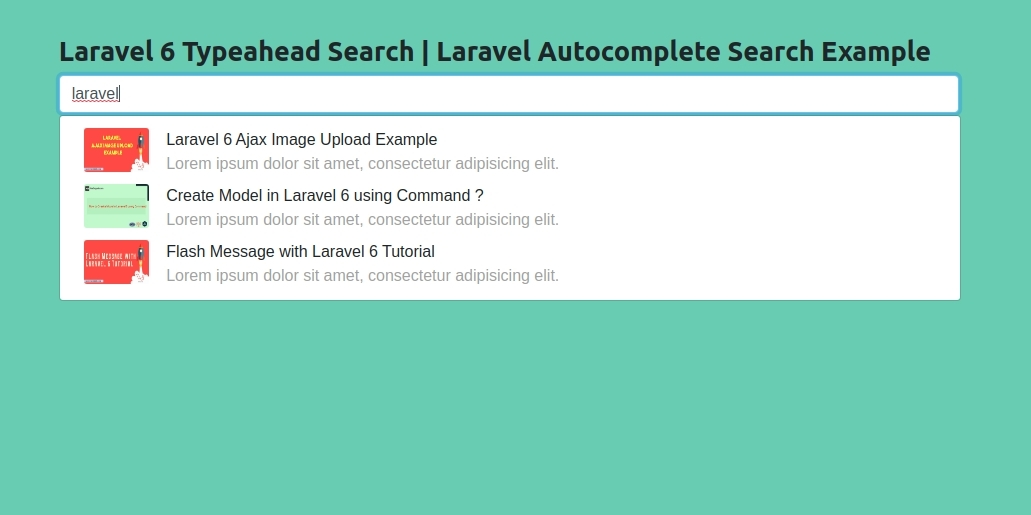
How to implement autocomplete search with Database in laravel 7/6 app with jquery typeahead js. In this laravel tutorial, We will share with you how to implement autocomplete search with database using jquery typeahead js example.
Bootstrap Typeahead JS provide way of user interface so, we can easily write code of jquery ajax and make it dynamic autocomplete search in laravel 7/6 application. we can easily use Typeahead JS with bootstrap.
Follow bellow step to create simple autocomplete search with laravel 7/6 application.
Step 1: Install Laravel Project
First, you need to download the laravel fresh setup. Use this command then download laravel project setup :
composer create-project --prefer-dist laravel/laravel blog
Step 2: Setup Database
After successfully install laravel 7/6 Application, Go to your project .env file and set up database credential and move next step :
DB_CONNECTION=mysql
DB_HOST=127.0.0.1
DB_PORT=3306
DB_DATABASE=here your database name
DB_USERNAME=here database username
DB_PASSWORD=here database password
Step 3: Create Migration
Now you will create a table posts then follw this command in your terminal:
php artisan make:migration create_posts_table
It command will create migration file for the posts table.
database/migrations/create_posts_table.php
<?php

use Illuminate\Database\Migrations\Migration;
use Illuminate\Database\Schema\Blueprint;
use Illuminate\Support\Facades\Schema;

class CreatePostsTable extends Migration
{
    /**
     * Run the migrations.
     *
     * @return void
     */
    public function up()
    {
        Schema::create('posts', function (Blueprint $table) {
            $table->bigIncrements('id');
            $table->string('title');
            $table->string('image');
            $table->text('body');
            $table->timestamps();
        });
    }

    /**
     * Reverse the migrations.
     *
     * @return void
     */
    public function down()
    {
        Schema::dropIfExists('posts');
    }
}
Next,this command use to in your terminal then this setup create to in your database.
php artisan migrate
Step 4: Create Model
Next,you will create to model in project.bellow this command :
php artisan make:model Post
It will create to file in app/Post.php model.
app/Post.php
<?php

namespace App;

use Illuminate\Database\Eloquent\Model;

class Post extends Model
{
    /**
     * The attributes that are mass assignable.
     *
     * @var array
     */
    protected $fillable = [
      'title','image','body'
    ];
}
Step 5: Make Route
you can create to route in web.php file.
routes/web.php
//PostController
Route::get('post',array('as'=>'post.index','uses'=>'PostController@index'));
Route::get('autocomplete',array('as'=>'autocomplete','uses'=>'PostController@autocomplete'));
Step 6: Create Controller
you need to create a controller name PostController.this command use to your terminal.
php artisan make:controller PostController
app/Http/Controllers/PostController.php
<?php

namespace App\Http\Controllers;

use Illuminate\Http\Request;
use App\Post;

class PostController extends Controller
{
    public function index()
    {
    	return view('post');
    }

    /**
     * Show the form for creating a new resource.
     *
     * @return \Illuminate\Http\Response
     */
    public function autocomplete(Request $request)
    {
        $data = Post::select("title as name","image as img","body as desc")->where("title","LIKE","%{$request->input('query')}%")->get();

        return response()->json($data);
    }
}
Step 7: Create View File
In this step you need to create blade view file.
resources/views/post.blade.php
<!DOCTYPE html>
<html>
<head>
    <title>Typehead</title>
    <link rel="stylesheet" href="https://stackpath.bootstrapcdn.com/bootstrap/4.4.1/css/bootstrap.min.css" integrity="sha384-Vkoo8x4CGsO3+Hhxv8T/Q5PaXtkKtu6ug5TOeNV6gBiFeWPGFN9MuhOf23Q9Ifjh" crossorigin="anonymous">
</head>
    <style type="text/css">
        img{
            border-radius: 3px;
        }
        p{
            color: #a1a1a1;
        }
        ul{
            width: 96%;
        }
    </style>
<body>
    <div class="row">
        <div class="col-md-8 offset-md-2">
            <h5><strong>Laravel 7/6  Typeahead Search | Laravel Autocomplete Search Example</strong></h5>
            <input type="text" class="form-control typeahead">
        </div>
    </div>

</body>
<script src="//ajax.googleapis.com/ajax/libs/jquery/1.9.1/jquery.js"></script>
<script src="https://cdnjs.cloudflare.com/ajax/libs/bootstrap-3-typeahead/4.0.1/bootstrap3-typeahead.min.js"></script>
<script type="text/javascript">
    var path = "{{ route('autocomplete') }}";
    $('input.typeahead').typeahead({
        source:  function (query, process) {
            return $.get(path, { query: query }, function (data) {
                return process(data);
            });
        },
        highlighter: function (item, data) {
            var parts = item.split('#'),
                html = '<div class="row">';
                html += '<div class="col-md-2">';
                html += '<img src="/image/'+data.img+'"/ height="44px;" width="65px;">';
                html += '</div>';
                html += '<div class="col-md-10 pl-0">';
                html += '<span>'+data.name+'</span>';
                html += '<p class="m-0">'+data.desc+'</p>';
                html += '</div>';
                html += '</div>';

            return html;
        }
    });
</script>
</html>
Step 8: Run Development Server
you can run to laravel project in your teminal.bellow command
php artisan serve
then make to ulr:
http://localhost:8000/post
It will help you....
#Laravel 7
#Jquery
#Laravel
#Laravel 6