15-May-2024
.
Admin

Hi, Dev
In this guide, we'll delve into crafting personalized validation regulations within your Laravel 11 setup.
Laravel comes with a set of default validation rules like email, required, unique, and date. However, if you require a custom validation rule in Laravel, I can walk you through the process.
Let's take an example where we'll craft a custom validation rule named BirthYearRule. We'll integrate an input text box for birth_year and ensure that the user inputs a year between 1980 and the present year, employing our custom validation.
Step for Laravel 11 Make a Custom Validation Rule Example
Step 1: Install Laravel 11
Step 2: Create Route
Step 3: Create Validation Rule
Step 4: Create Controller
Step 5: Create View File
Run Laravel App
Step 1: Install Laravel 11
First of all, we need to get a fresh Laravel 11 version application using the command below because we are starting from scratch. So, open your terminal or command prompt and run the command below:
composer create-project laravel/laravel example-app
Step 2: Create Routes
In this step, we will create two routes: GET and POST for a custom validation rule example. So let's add it.
routes/web.php
<?php

use Illuminate\Support\Facades\Route;

use App\Http\Controllers\CustomValidationController;

Route::get('custom-validation', [CustomValidationController::class, 'create']);
Route::post('custom-validation', [CustomValidationController::class, 'store'])->name('custom.validation.post');
Step 3: Create Validation Rule
In this step, we will create a new "BirthYearRule" validation rule that will check if the user enters a valid year. So let's run the command below and update the rule validation file.
php artisan make:rule BirthYearRule
app/Rules/BirthYearRule.php
<?php

namespace App\Rules;

use Closure;
use Illuminate\Contracts\Validation\ValidationRule;

class BirthYearRule implements ValidationRule
{
    /**
     * Run the validation rule.
     *
     * @param  \Closure(string): \Illuminate\Translation\PotentiallyTranslatedString  $fail
     */
    public function validate(string $attribute, mixed $value, Closure $fail): void
    {
        if(!($value > 1980 & $value < date('Y'))){
            $fail('The :attribute must be between 1980 to '.date('Y').'.');
        }
    }
}
Step 4: Create Controller
In this step, we have to create a new controller named CustomValidationController, and we also need to add two methods: create() and store() to that controller. We will use the BirthYearRule validation on the store method, so let's update the following code:
app/Http/Controllers/CustomValidationController.php
<?php

namespace App\Http\Controllers;

use Illuminate\Http\Request;
use Illuminate\View\View;
use Illuminate\Http\RedirectResponse;
use App\Rules\BirthYearRule;

class CustomValidationController extends Controller
{
    /**
     * Show the application dashboard.
     *
     * @return \Illuminate\Http\Response
     */
    public function create(): View
    {
        return view('forms');
    }

    /**
     * Show the application dashboard.
     *
     * @return \Illuminate\Http\Response
     */
    public function store(Request $request): RedirectResponse
    {
        $validatedData = $request->validate([
                'name' => 'required',
                'birth_year' => [
                    'required',
                    new BirthYearRule()
                ]
            ]);

        /*
            $validatedData['password'] = bcrypt($validatedData['password']);
            $user = User::create($validatedData);
        */

        return back()->with('success', 'User created successfully.');
    }
}
Step 5: Create View File
In the last step, let's create forms.blade.php (resources/views/forms.blade.php) for the creation form and put the following code:
resources/views/forms.blade.php
<!DOCTYPE html>
<html>
<head>
<title>Laravel 11 Create Custom Validation Rules Example - NiceSnippets.com</title>
<meta charset="utf-8">
<meta http-equiv="X-UA-Compatible" content="IE=edge">
<meta name="viewport" content="width=device-width, initial-scale=1">
<link href="https://cdn.jsdelivr.net/npm/bootstrap@5.0.2/dist/css/bootstrap.min.css" rel="stylesheet">
</head>
<body>
<div class="container">
<div class="card mt-5">
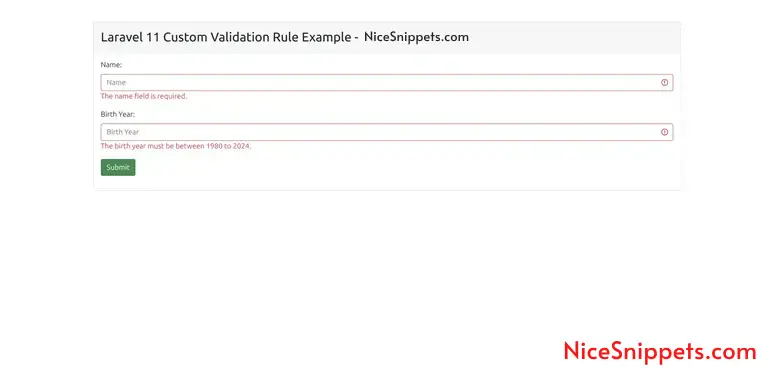
<h3 class="card-header p-3">Laravel 11 Create Custom Validation Rules Example - NiceSnippets.com</h3>
<div class="card-body">
<form method="POST" action="{{ route('custom.validation.post') }}">
{{ csrf_field() }}
<div class="mb-3">
<label class="form-label" for="inputName">Name:</label>
<input
type="text"
name="name"
id="inputName"
class="form-control @error('name') is-invalid @enderror"
placeholder="Name">
@error('name')
<span class="text-danger">{{ $message }}</span>
@enderror
</div>
<div class="mb-3">
<label class="form-label" for="inputEmail">Birth Year:</label>
<input
type="text"
name="birth_year"
id="inputEmail"
class="form-control @error('birth_year') is-invalid @enderror"
placeholder="Birth Year">
@error('birth_year')
<span class="text-danger">{{ $message }}</span>
@endif
</div>
<div class="mb-3">
<button class="btn btn-success btn-submit">Submit</button>
</div>
</form>
</div>
</div>
</div>
</body>
</html>
Run Laravel App:
All the required steps have been done, now you have to type the given below command and hit enter to run the Laravel app:
php artisan serve
Now, Go to your web browser, type the given URL and view the app output:
http://localhost:8000/custom-validation
Output: You Email Look Like This
I hope it can help you...
#Laravel 11
