13-Dec-2023
.
Admin
Hello Dev,
Now, let's see example of how to set up laravel 10 with vue 3 and vuetify 3. this example will help you how to setup laravel 10 with vite. In this article, we will implement a vue 3 and vuetify. you will learn how to install vue 3 in laravel 10 with vite.
Laravel has consistently evolved, adapting to the dynamic landscape of web development. Until Laravel 8, webpack was the preferred bundler. However, from Laravel 9 onwards, Vite has taken the forefront, altering the setup process for Vue slightly. Let's navigate through the steps of setting up Laravel 10 with Vite, Vue 3, and Vuetify 3.
Step 1: Install a New Laravel Project
Prerequisites: Make sure that PHP and Composer are installed on your local machine.
1. Installing Dependencies:
Install Node and npm for managing JavaScript dependencies.
For those who have set up PHP and Composer using Laravel Valet, the Laravel installer will be readily available.
2. Creating a Laravel Project:
Using the Composer create-project command:
composer create-project laravel/laravel my-app
Or, use the globally installed Laravel installer:
composer global require laravel/installer
laravel new my-app
3. Vite Configuration: A new Laravel project will include a vite.config.js file in its root, replacing the older webpack.mix.js file.
Default contents:
import { defineConfig } from "vite";
import laravel from "laravel-vite-plugin";

export default defineConfig({
    plugins: [
        laravel({
            input: ["resources/css/app.css", "resources/js/app.js"],
            refresh: true,
        }),
    ],
});
Step 2: Set Up Vue3
1. Install Vue3 and Vue-loader:
npm install vue vue-loader
2. Install Dependencies:
npm install
3. Modify the App.js File:
Navigate to resources/js/app.js, and you will initially find:
import "./bootstrap";
Add Vue setup and create an app.vue file inside resources/js/layouts/app.vue for testing:
<template>
    <div>
        <h1>Hello world !!!</h1>
    </div>
</template>
Incorporate this within app.js:
import "./bootstrap";
import { createApp } from "vue";
import app from "./layouts/app.vue";

createApp(app).mount("#app");
4. Update Blade File:
In resources/views/welcome.blade.php, update the body content to include the Vue app:
<body>
    <div id="app"></div>
    @vite('resources/js/app.js')
</body>
5. Update Environment Variables:
Set APP_URL in the .env file:
APP_URL=http://127.0.0.1:8000
6. Run the Development Servers:
Open two terminal windows:
In the first, run: php artisan serve
In the second, run: npm run dev
If errors arise regarding Vue file handling like this:
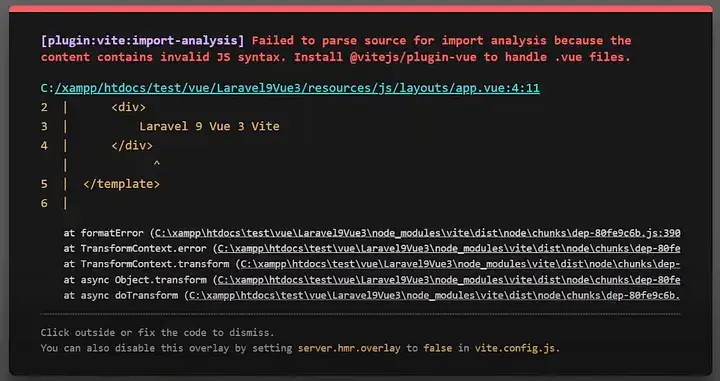
install vitejs/plugin-vue:
npm i @vitejs/plugin-vue
Update the vite.config.js to include the Vue plugin:
import vue from "@vitejs/plugin-vue";

// inside the plugins array:
vue(),
It will become like this:
import { defineConfig } from "vite";
import laravel from "laravel-vite-plugin";
import vue from "@vitejs/plugin-vue";

export default defineConfig({
    plugins: [
        vue(),
        laravel({
            input: ["resources/css/app.css", "resources/js/app.js"],
            refresh: true,
        }),
    ],
});
Relaunch the development servers. If you've followed along, everything should be working fine. With Vite, you benefit from hot module reloading, allowing changes to appear instantly without a page refresh.
Step 3: Incorporate Vuetify3
1. Install Vuetify3:
npm install vuetify
2. Setup Vuetify Configuration:
Inside resources/js, create a vuetify.js file (resources/js/vuetify.js)and populate it with Vuetify configuration and theming options, like this:
// Vuetify
import "vuetify/styles";
import { createVuetify } from "vuetify";
import * as components from "vuetify/components";
import * as directives from "vuetify/directives";

const customeTheme = {
    dark: false,
    colors: {
        primary: "#673AB7",
        secondary: "#424242",
        accent: "#82B1FF",
        error: "#FF5252",
        info: "#2196F3",
        success: "#4CAF50",
        warning: "#FFC107",
        lightblue: "#14c6FF",
        yellow: "#FFCF00",
        pink: "#FF1976",
        orange: "#FF8657",
        magenta: "#C33AFC",
        darkblue: "#1E2D56",
        gray: "#909090",
        neutralgray: "#9BA6C1",
        green: "#2ED47A",
        red: "#FF5c4E",
        darkblueshade: "#308DC2",
        lightgray: "#BDBDBD",
        lightpink: "#FFCFE3",
        white: "#FFFFFF",
        muted: "#6c757d",
    },
};

const vuetify = createVuetify({
    components,
    directives,
    theme: {
        defaultTheme: "customeTheme",
        themes: {
            customeTheme,
        },
    },
});

export default vuetify;
3. Integrate Vuetify into app.js:
Modify app.js to incorporate Vuetify:
import vuetify from "./vuetify";
createApp(app).use(vuetify).mount("#app");
Testing Vuetify3 Integration
After you’ve completed the setup:
1. Run the Servers:
Use php artisan serve to start the Laravel server.
In another terminal window, use npm run dev to start the Vite server.
2. Navigate to Your App:
Head over to the APP_URL where your Laravel app is running, e.g., http://127.0.0.1:8000
3. Test Vuetify:
Inside app.vue, add the Vuetify button component:
<v-btn color="primary">Button</v-btn>
Save the file. With Vite's hot module reloading, the changes should instantly appear on your page.
4. Visual Confirmation:
Here’s how your screen should look after the changes:

Happy coding with your Laravel 10 setup!
I hope it can help you...
#Laravel 10