21-Dec-2023
.
Admin
Hello Dev,
Now, let's see a post on how to store data using pop-modal in Laravel 10. you can see how to create a popup modal in laravel 10. We will use how to store updated data on modal laravel 10. We will use how to store data in pop-modal in laravel10.
So, let's follow a few steps to create an example of how to use modal in laravel 10.
Step 1: Create Laravel Project
In this tutorial, I will describe how to store data in a Bootstrap 4 pop modal in Laravel.
composer create-project laravel/laravel employee "5.8.*"
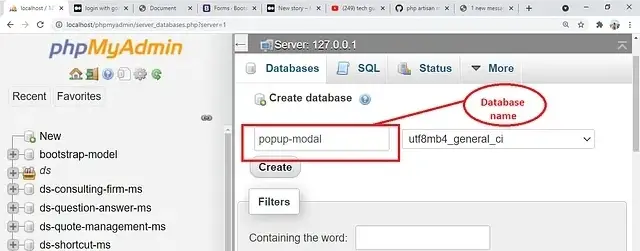
Step 2: Go to .env and set up connect with database
DB_HOST=127.0.0.1
DB_PORT=3306
DB_DATABASE=popup-modal
DB_USERNAME=root
DB_PASSWORD=
Step 3: Migrate Table
php artisan migrate
Next, create a migration table named 'employees'. Let's go ahead and create the table.
php artisan make:migration create_employees_table
Next, go to database/migrations/create_employees_table and open this file.
Simply copy and paste this code.
<?php

use Illuminate\Support\Facades\Schema;
use Illuminate\Database\Schema\Blueprint;
use Illuminate\Database\Migrations\Migration;

class CreateEmployeesTable extends Migration
{
    /**
     * Run the migrations.
     *
     * @return void
     */
    public function up()
    {
        Schema::create('employees', function (Blueprint $table) {
            $table->bigIncrements('id');
            $table->string('fname');
            $table->string('lname');
            $table->string('email');
            $table->string('address');
            $table->string('mobile');
            $table->timestamps();
        });
    }

    /**
     * Reverse the migrations.
     *
     * @return void
     */
    public function down()
    {
        Schema::dropIfExists('employees');
    }
}
Php artisan migrate
Step 4: The next step is to create view files in the resources/views/[folder_name] folder.
empmodel.blade.php
Go to empmodel.blade.php and paste below code
<!DOCTYPE html>
<html lang="en">
<head>
    <meta charset="UTF-8">
    <meta name="viewport" content="width=device-width, initial-scale=1.0">
    <meta http-equiv="X-UA-Compatible" content="ie=edge">
    <title>How to Store Data using Pop-Modal in Laravel 10? - Nicesnippets.com</title>
    <link rel="stylesheet" href="https://maxcdn.bootstrapcdn.com/bootstrap/4.0.0/css/bootstrap.min.css" integrity="sha384-Gn5384xqQ1aoWXA+058RXPxPg6fy4IWvTNh0E263XmFcJlSAwiGgFAW/dAiS6JXm" crossorigin="anonymous">
</head>
<body>

    {{-- model start here  --}}

    <div class="modal fade" id="exampleModal" tabindex="-1" role="dialog" aria-labelledby="exampleModalLabel" aria-hidden="true">
        <div class="modal-dialog" role="document">
            <div class="modal-content">
                <div class="modal-header">
                    <h5 class="modal-title" id="exampleModalLabel">Add Employee Detail</h5>
                    <button type="button" class="close" data-dismiss="modal" aria-label="Close">
                        <span aria-hidden="true">×</span>
                    </button>
                </div>
                <form action="{{ action('EmployeeController@store')}}" method="POST">
                    {{ csrf_field() }}
                    <div class="modal-body">

                        <div class="form-group">
                            <label>First Name</label>
                            <input type="text" name="fname" class="form-control" placeholder="Enter first name">
                        </div>

                        <div class="form-group">
                            <label>Last Name</label>
                            <input type="text" name="lname" class="form-control" placeholder="Enter last name">
                        </div>

                        <div class="form-group">
                            <label>Email</label>
                            <input type="text" name="email" class="form-control" placeholder="Enter email">
                        </div>

                        <div class="form-group">
                            <label>Address</label>
                            <input type="text" name="address" class="form-control" placeholder="Enter address">
                        </div>

                        <div class="form-group">
                            <label>Mobile</label>
                            <input type="text" name="mobile" class="form-control" placeholder="Enter mobile">
                        </div>

                        <button type="submit" class="btn btn-primary">Submit</button>

                    </div>
                </form>
            </div>
        </div>
    </div>

    {{-- model end here  --}}

    <br><br><br>
    <div class="container">
        <h1>Store Data in Pop-modal in laravel</h1>

        @if (count($errors) >0)
            <div class="alert alert-danger">
                <ul>
                    @foreach($errors->all() as $error)
                        <li>{{$error}}</li>
                    @endforeach
                </ul>
            </div>
        @endif

        @if (\Session::has('success'))
            <div class="alert alert-success">
                <p>{{ \Session::get('success') }}</p<
            </div>
        @endif

        <button type="button" class="btn btn-primary" data-toggle="modal" data-target="#exampleModal">
            Add Employee
        </button>
    </div>

    {{-- pop model start here  --}}

    <!-- Button trigger modal -->
        {{-- <button type="button" class="btn btn-primary" data-toggle="modal" data-target="#exampleModal">
            Launch demo modal
        </button> --}}

        <!-- Modal -->

    {{-- pop model end here  --}}

<script src="https://code.jquery.com/jquery-3.2.1.slim.min.js" integrity="sha384-KJ3o2DKtIkvYIK3UENzmM7KCkRr/rE9/Qpg6aAZGJwFDMVNA/GpGFF93hXpG5KkN" crossorigin="anonymous"></script>
<script src="https://cdnjs.cloudflare.com/ajax/libs/popper.js/1.12.9/umd/popper.min.js" integrity="sha384-ApNbgh9B+Y1QKtv3Rn7W3mgPxhU9K/ScQsAP7hUibX39j7fakFPskvXusvfa0b4Q" crossorigin="anonymous"></script>
<script src="https://maxcdn.bootstrapcdn.com/bootstrap/4.0.0/js/bootstrap.min.js" integrity="sha384-JZR6Spejh4U02d8jOt6vLEHfe/JQGiRRSQQxSfFWpi1MquVdAyjUar5+76PVCmYl" crossorigin="anonymous"></script>
</body>
</html>
Step 5: Create Model.
php artisan make:model Employee
Go to Employee model and paste the below code.
<?php

namespace App;

use Illuminate\Database\Eloquent\Model;

class Employee extends Model
{
    //
}
Step 6: Create Controller.
php artisan make:controller EmployeeController -r
Go to EmployeeController and paste the below code.
<?php

namespace App\Http\Controllers;

use Illuminate\Http\Request;
use App\Employee;

class EmployeeController extends Controller
{
    /**
     * Display a listing of the resource.
     *
     * @return \Illuminate\Http\Response
     */
    public function index()
    {
        return view('empmodel');
    }

    /**
     * Show the form for creating a new resource.
     *
     * @return \Illuminate\Http\Response
     */
    public function create()
    {
        //
    }

    /**
     * Store a newly created resource in storage.
     *
     * @param  \Illuminate\Http\Request  $request
     * @return \Illuminate\Http\Response
     */
    public function store(Request $request)
    {
        $this->validate($request,[
            'fname' => 'required',
            'lname' => 'required',
            'email' => 'required',
            'address' => 'required',
            'mobile' => 'required',
        ]);

        $emps = new Employee;

        $emps->fname = $request->input('fname');
        $emps->lname = $request->input('lname');
        $emps->email = $request->input('email');
        $emps->address = $request->input('address');
        $emps->mobile = $request->input('mobile');

        $emps->save();
        return redirect('/employee')->with('success', 'Data saved');


    }

    /**
     * Display the specified resource.
     *
     * @param  int  $id
     * @return \Illuminate\Http\Response
     */
    public function show($id)
    {
        //
    }

    /**
     * Show the form for editing the specified resource.
     *
     * @param  int  $id
     * @return \Illuminate\Http\Response
     */
    public function edit($id)
    {
        //
    }

    /**
     * Update the specified resource in storage.
     *
     * @param  \Illuminate\Http\Request  $request
     * @param  int  $id
     * @return \Illuminate\Http\Response
     */
    public function update(Request $request, $id)
    {
        //
    }

    /**
     * Remove the specified resource from storage.
     *
     * @param  int  $id
     * @return \Illuminate\Http\Response
     */
    public function destroy($id)
    {
        //
    }
}
Step 7: Create Route.
Go To Route/web.php And Paste Below Code.
<?php

/*
|--------------------------------------------------------------------------
| Web Routes
|--------------------------------------------------------------------------
|
| Here is where you can register web routes for your application. These
| routes are loaded by the RouteServiceProvider within a group which
| contains the "web" middleware group. Now create something great!
|
*/

Route::get('/', function () {
    return view('welcome');
});

Route::resource('/employee','EmployeeController');
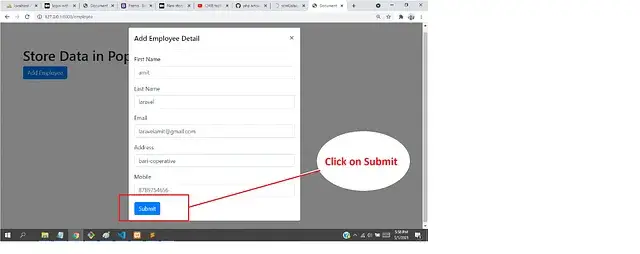
Go To Browser And Search.
http://127.0.0.1:8000/employee
Please fill in all the fields and click on Submit.
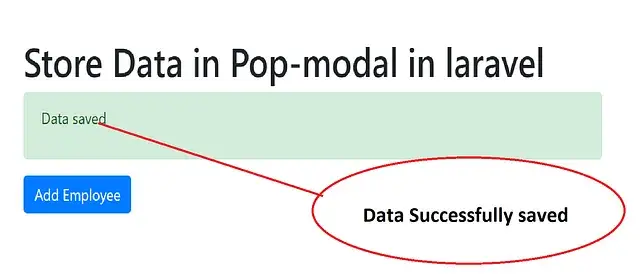
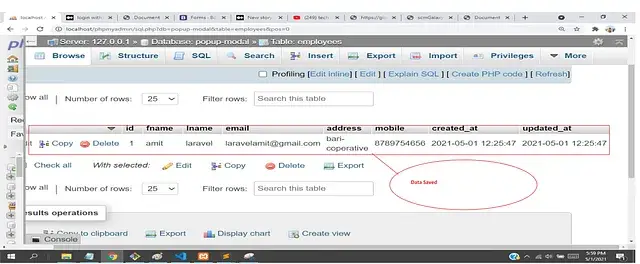
Next Go to Localhost/phpmyadmin and check your data has been successfully saved
I hope it can help you...
#Laravel 10