02-Jul-2024
.
Admin

Hi, Dev
In this article, I will demonstrate how to implement Facebook login in Laravel 11 using the Socialite composer package. We will explore how to integrate this functionality with Laravel UI, Laravel Jetstream, and Laravel Breeze to enable Facebook account login.
As we know, social media is becoming increasingly popular worldwide, with almost everyone having accounts on platforms like Facebook, GitHub, Gmail, Twitter, etc. Most people have Facebook accounts, making social media login a valuable feature for applications. It enhances user experience by eliminating the need to fill out sign-up or sign-in forms, encouraging more people to connect with your website.
In this example, we will install the Socialite composer package to enable login with a Facebook account. We will then install Laravel UI for Bootstrap authentication. Following that, we will add a "Login with Facebook" button, allowing users to log in and register using their Facebook accounts. Let's go through the steps below.
Step for Login with Facebook Account in Laravel 11?
Step 1: Install Laravel 11
Step 2: Install Laravel UI
Step 3: Install Socialite
Step 4: Create Facebook App
Step 5: Add facebook_id Column
Step 6: Create Routes
Step 7: Create Controller
Step 8: Update Blade File
Run Laravel App
Step 1: Install Laravel 11
This step is not required; however, if you have not created the Laravel app, then you may go ahead and execute the below command:
composer create-project laravel/laravel example-app
Step 2: Install Laravel UI
Now, in this step, we need to use Composer command to install Laravel UI, so let's run the below command and install the below library.
composer require laravel/ui
Now, we need to create authentication using the below command. You can create basic login, register, and email verification. We will run the below commands to create Bootstrap auth scaffold:
php artisan ui bootstrap --auth
Now, let's node js package:
npm install
let's run package:
npm run build
Step 3: Install Socialite
In the first step, we will install the Socialite Package, which provides an API to connect with facebook accounts. So, first open your terminal and run the below command:
composer require laravel/socialite
Step 4: Create Facebook App
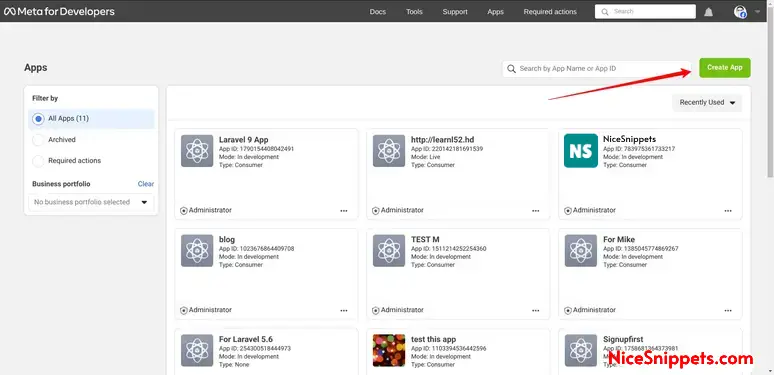
To create our facebook app and receive the app credentials open the Facebook Apps and sign up or log in.
To guide you through the steps listed above, I’ve included screenshots of the entire process below:
1. Create New App
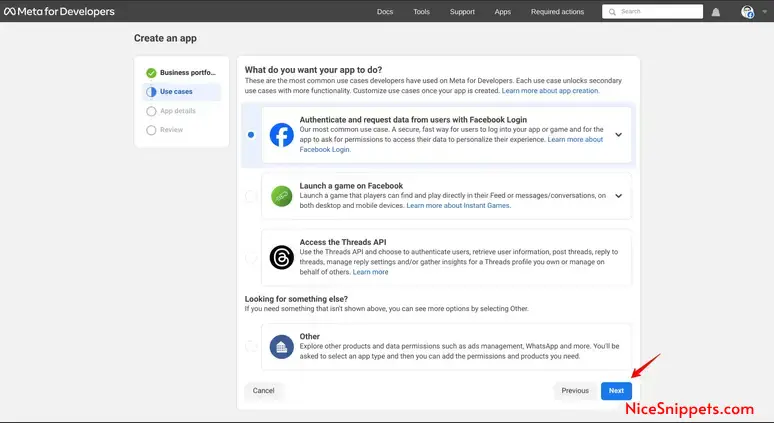
2. Choose following option and next.
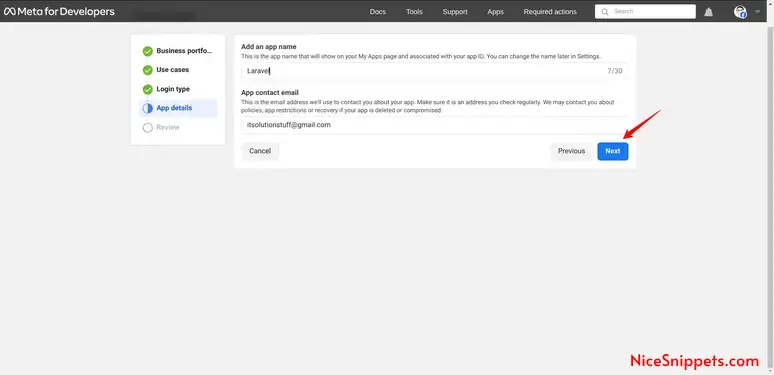
3. Add Application details and Click on submit button
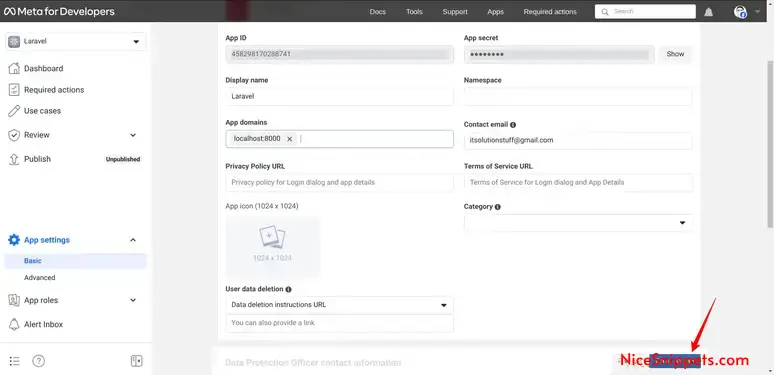
4. In the Facebook App dashboard, navigate to “Settings†and then “Basicâ€. Copy App ID and Secret from this screen and add on .env file.
5. Now go to Products. And click Configure, Add Call Back URL like this way:
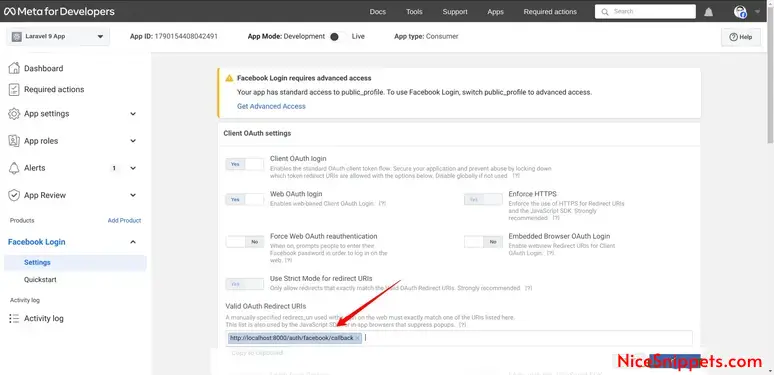
Now you have to set app id, secret and call back URL in config file so open config/services.php and set id and secret this way:
config/services.php
return [
    ....

    'facebook' => [
        'client_id' => env('FACEBOOK_CLIENT_ID'),
        'client_secret' => env('FACEBOOK_CLIENT_SECRET'),
        'redirect' => env('FACEBOOK_REDIRECT_URI'),
    ],
]
Then you need to add facebook client id and client secret in .env file:
.env
FACEBOOK_CLIENT_ID=1790154408042491
FACEBOOK_CLIENT_SECRET=f95f2c55b0a3cc9eb1a8...
FACEBOOK_REDIRECT_URI=http://localhost:8000/auth/facebook/callback
Step 5: Add facebook_id Column
In this step, first, we have to create a migration to add the facebook_id in your user table. So let's run the below command:
php artisan make:migration add_facebook_id_column
Migration
<?php

use Illuminate\Database\Migrations\Migration;
use Illuminate\Database\Schema\Blueprint;
use Illuminate\Support\Facades\Schema;

return new class extends Migration
{
    /**
     * Run the migrations.
     */
    public function up(): void
    {
        Schema::table('users', function ($table) {
            $table->string('facebook_id')->nullable();
        });
    }

    /**
     * Reverse the migrations.
     */
    public function down(): void
    {
        //
    }
};
Now, run the migration command:
php artisan migrate
Update mode like this way:
app/Models/User.php
<?php

namespace App\Models;

use Illuminate\Database\Eloquent\Factories\HasFactory;
use Illuminate\Foundation\Auth\User as Authenticatable;
use Illuminate\Notifications\Notifiable;

class User extends Authenticatable
{
    use HasFactory, Notifiable;

    /**
     * The attributes that are mass assignable.
     *
     * @var array
     */
    protected $fillable = [
        'name',
        'email',
        'password',
        'facebook_id'
    ];

    /**
     * The attributes that should be hidden for serialization.
     *
     * @var array
     */
    protected $hidden = [
        'password',
        'remember_token',
    ];

    /**
     * Get the attributes that should be cast.
     *
     * @return array
     */
    protected function casts(): array
    {
        return [
            'email_verified_at' => 'datetime',
            'password' => 'hashed',
        ];
    }
}
Step 6: Create Routes
After adding the `facebook_id` column, first, we have to add new routes for facebook login. So let's add the below route in the `routes.php` file.
routes/web.php
<?php

use Illuminate\Support\Facades\Route;

use App\Http\Controllers\FacebookController;

Route::get('/', function () {
    return view('welcome');
});

Auth::routes();

Route::get('/home', [App\Http\Controllers\HomeController::class, 'index'])->name('home');

Route::controller(FacebookController::class)->group(function(){
    Route::get('auth/facebook', 'redirectToFacebook')->name('auth.facebook');
    Route::get('auth/facebook/callback', 'handleFacebookCallback');
});
Step 7: Create Controller
After adding the routes, we need to add a method for facebook authentication. This method will handle the facebook callback URL, etc. First, put the code below in your FacebookController.php file.
app/Http/Controllers/FacebookController.php
<?php

namespace App\Http\Controllers;

use Illuminate\Http\Request;
use Laravel\Socialite\Facades\Socialite;
use Exception;
use App\Models\User;
use Illuminate\Support\Facades\Auth;

class FacebookController extends Controller
{
    /**
     * Create a new controller instance.
     *
     * @return void
     */
    public function redirectToFacebook()
    {
        return Socialite::driver('facebook')->redirect();
    }

    /**
     * Create a new controller instance.
     *
     * @return void
     */
    public function handleFacebookCallback()
    {
        try {

            $user = Socialite::driver('facebook')->user();

            $findUser = User::where('facebook_id', $user->id)->first();

            if($findUser){

                Auth::login($findUser);

                return redirect()->intended('home');

            }else{
                $newUser = User::updateOrCreate(['email' => $user->email],[
                        'name' => $user->name,
                        'facebook_id'=> $user->id,
                        'password' => encrypt('123456dummy')
                    ]);

                Auth::login($newUser);

                return redirect()->intended('home');
            }

        } catch (Exception $e) {
            dd($e->getMessage());
        }
    }
}
Step 8: Update Blade File
Ok, now at last we need to add blade view so first create new file login.blade.php file and put bellow code:
resources/views/auth/login.blade.php
@extends('layouts.app')

@section('content')
<div class="container">
    <div class="row justify-content-center">
        <div class="col-md-8">
            <div class="card">
                <div class="card-header">{{ __('Login') }}</div>

                <div class="card-body">
                    <form method="POST" action="{{ route('login') }}">
                        @csrf

                        <div class="row mb-3">
                            <label for="email" class="col-md-4 col-form-label text-md-end">{{ __('Email Address') }}</label>

                            <div class="col-md-6">
                                <input id="email" type="email" class="form-control @error('email') is-invalid @enderror" name="email" value="{{ old('email') }}" required autocomplete="email" autofocus>

                                @error('email')
                                    <span class="invalid-feedback" role="alert">
                                        <strong>{{ $message }}</strong>
                                    </span>
                                @enderror
                            </div>
                        </div>

                        <div class="row mb-3">
                            <label for="password" class="col-md-4 col-form-label text-md-end">{{ __('Password') }}</label>

                            <div class="col-md-6">
                                <input id="password" type="password" class="form-control @error('password') is-invalid @enderror" name="password" required autocomplete="current-password">

                                @error('password')
                                    <span class="invalid-feedback" role="alert">
                                        <strong>{{ $message }}</strong>
                                    </span>
                                @enderror
                            </div>
                        </div>

                        <div class="row mb-3">
                            <div class="col-md-6 offset-md-4">
                                <div class="form-check">
                                    <input class="form-check-input" type="checkbox" name="remember" id="remember" {{ old('remember') ? 'checked' : '' }}>

                                    <label class="form-check-label" for="remember">
                                        {{ __('Remember Me') }}
                                    </label>
                                </div>
                            </div>
                        </div>

                        <div class="row mb-0">
                            <div class="col-md-8 offset-md-4">
                                <button type="submit" class="btn btn-primary">
                                    {{ __('Login') }}
                                </button>

                                @if (Route::has('password.request'))
                                    <a class="btn btn-link" href="{{ route('password.request') }}">
                                        {{ __('Forgot Your Password?') }}
                                    </a>
                                @endif
                            </div>
                        </div>

                        <div class="row mb-0">
                            <div class="col-md-6 offset-md-4 mt-2">
                                <a class="btn btn-primary" href="{{ route('auth.facebook') }}" style="display: block;">
                                    <svg xmlns="http://www.w3.org/2000/svg" width="40" height="40" viewBox="0 0 32 32">
                                        <path fill="#FFFFFF" d="M32 16.084c0-8.837-7.162-16-16-16S0 7.247 0 16.084c0 8.013 5.873 14.644 13.568 15.843v-11.22h-4.087v-4.623h4.087v-3.489c0-4.041 2.423-6.279 6.118-6.279 1.775 0 3.628.312 3.628.312v3.985h-2.046c-2.017 0-2.637 1.255-2.637 2.539v2.931h4.467l-.713 4.623h-3.754v11.22C26.127 30.728 32 24.097 32 16.084z"/>
                                    </svg>
                                    Login with Facebook
                                </a>
                            </div>
                        </div>

                    </form>
                </div>
            </div>
        </div>
    </div>
</div>
@endsection
Run Laravel App:
All the required steps have been done, now you have to type the given below command and hit enter to run the Laravel app:
php artisan serve
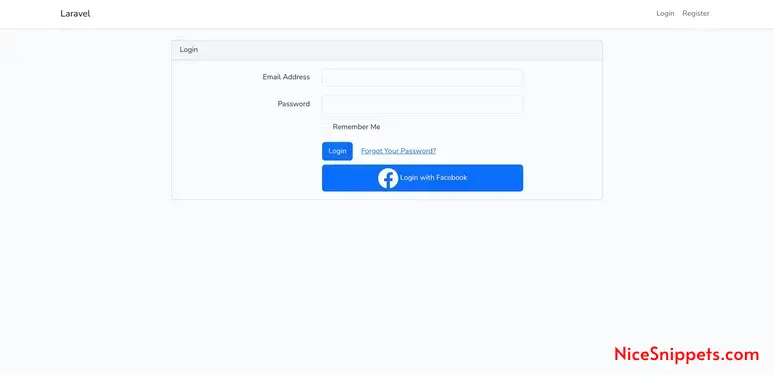
Now, Go to your web browser, type the given URL and view the app output:
http://localhost:8000/login
Output:
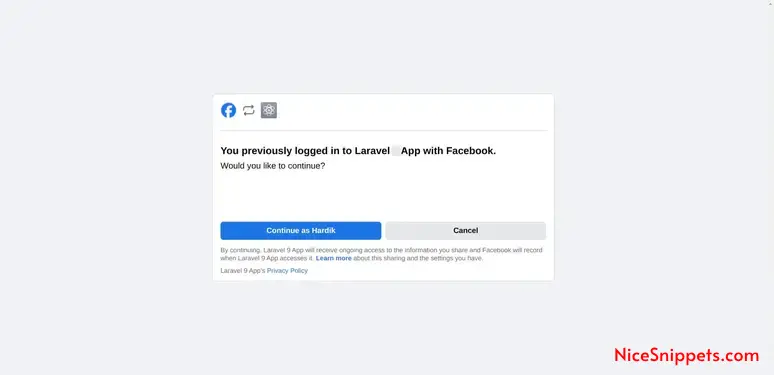
I hope it can help you...
#Laravel 11
